https://www.aacdelavan.com/wp-content/uploads/2019/07/NAPA-Know-How-Hot-Summer-Savings-From-NAPA-20.jpg6281200Advanced Auto Clinichttps://www.aacdelavan.com/wp-content/uploads/2021/01/Advanced-Auto-Clinic-Delavan-LOGO_WHITE.pngAdvanced Auto Clinic2019-07-19 11:15:422019-07-21 13:59:54NAPA Know How: Hot Summer Savings From NAPA – 20% Off Sitewide
Alexander Rossi drove his No. 27 NAPA AUTO PARTS Honda to a third-place finish at the Honda Indy Toronto.
With Rossi starting the Honda Indy Toronto from the fourth position, the NAPA Racing driver knew he had to have a flawless race in order to collect a podium finish. On the first turn of Lap 1, Rossi overtook the third-place starter, Ed Jones. At the tail end of the first lap, a six-car incident brought out the first caution of the day.
The remainder of the race remained consistent and clean for Rossi and the NAPA AutoCare crew. Two quick pit stops later, the team gave Rossi a fuel target to hit in order to hold position through the end of the race.
With only one lap remaining, Will Power made contact with the tire barriers bringing out the second and final caution of the race and ending the 85-lap event under yellow conditions. Rossi returned to pit lane with a third-place finish and only four points away from the championship lead.
“I think that we knew going into today that we didn’t have a race winning car,” said Rossi, “and it would take a little bit of luck to get that. The two in front of us drove a great race so to be able to finish in front of Josef [Newgarden] and get a trophy is a good day. Huge hats off to the 27 NAPA Andretti Honda boys – great pit stops, good strategy and we did what we needed to do today.”
Next Race: Iowa 300 at Iowa Speedway, Saturday, June 20 at 7:10 p.m. ET How to Watch or Listen: NBC Sports Network at 7:00 p.m. ET on Saturday; INDYCAR Radio Network Sirius 214//XM 209
https://www.aacdelavan.com/wp-content/uploads/2019/07/1563217043_NAPA-Know-How-Solid-Points-Day-for-Rossi-in-Toronto.jpg468895Advanced Auto Clinichttps://www.aacdelavan.com/wp-content/uploads/2021/01/Advanced-Auto-Clinic-Delavan-LOGO_WHITE.pngAdvanced Auto Clinic2019-07-15 11:08:072019-07-15 13:57:24NAPA Know How: Solid Points Day for Rossi in Toronto
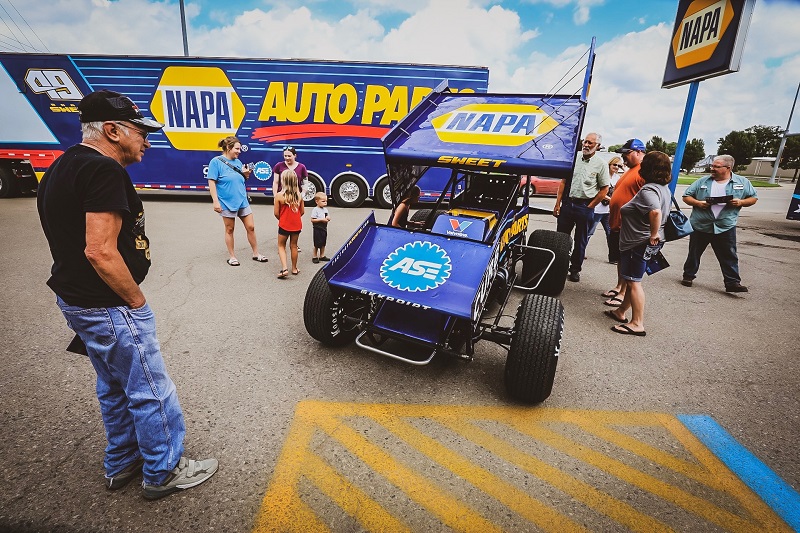
Brad Sweet captured his eighth and ninth World of Outlaws Series victories at Brown County Speedway and Cedar Lake Speedway over the weekend, maintaining his position atop the points standings.
Brad Sweet entered this week riding a wave of momentum by winning five out of the last seven NOS Energy Drink World of Outlaws Series (WoO) races. On Wednesday at Brown County Speedway in Aberdeen, SD, the momentum continued.
Before the racing began at the 1/3-mile oval in northeast South Dakota, the NAPA AUTO PARTS team stopped at the NAPA location in downtown Aberdeen for a public meet and greet with Sweet, where fans could get an up-close look at the Kasey Kahne Racing No. 49 car and hauler.
When on-track action got underway later that evening, Sweet and team were once again fast in practice and also won their heat race. The Dash, however, did not go the team’s way as Sweet finished fifth after starting third in the eight-lap shoot out.
At the drop of the green flag for the feature, Sweet patiently worked his way through traffic from his fifth starting position, navigating tricky track conditions on a fast, tight track. After a few early cautions, Sweet, the current WoO points leader, advanced to the second position and remained there for a majority of the race until he and then-leader Logan Schuchart were deep in heavy lapped traffic. Sweet was able to slip by Schuchart on the inside lane with six laps to go and held on to capture his eighth WoO feature win of 2019.
“We were awful in the Dash and the NAPA AUTO PARTS guys made a great adjustment for the [Feature] and we had a really good car,” Sweet said.
The series then shifted its focus to Cedar Lake Speedway in New Richmond, Wisc., for races on Friday and Saturday night.
With inclement weather in the forecast, World of Outlaw teams had one eye on the weather when the pit gate opened on Friday and into the evening. Sweet was able to put down the seventh-fastest lap during qualifying and finished fifth in his heat.
A handful of rain showers delayed the start of the feature, and track crews worked quickly to prep the track once there appeared to be a break in the weather. However, just seven laps of the feature were completed before the skies opened up once again, forcing officials to postpone the remaining 28 laps to Saturday afternoon.
Teams returned the following day with clearer skies, ready for a double-header event. First up on the agenda was to finish the remaining 28 laps of Friday night’s feature before rolling into Saturday’s regularly scheduled program.
Sweet and the NAPA team quickly moved up from their seventh position to fourth at the drop of the green flag of Friday’s make-up race, but just four laps into the race the No. 49 machine stopped on the track with a broken U-joint, relegating the team to a 23rd-place finish and their first DNF of the season.
With Saturday night’s scheduled program quickly approaching, the NAPA team was forced to roll out a back-up car as repairs to the primary were too lengthy to complete in time.
The Eric Prutzman-led NAPA team did not disappoint, as Sweet qualified in the eighth position and was able to advance to the FastPass Dash after a fifth-place finish in his heat race. The team had the No. 49 machine hooked up during the eight-lap dash, where Sweet was able to advance from the fifth position to win, giving him the pole for the 35-lap feature.
Sweet jumped out to an early lead at the drop of the green flag in the feature and never looked back. The Grass Valley, Calif., native led all 35 laps, and as the track began to take rubber late in the race, Sweet maintained his lead. When he crossed the finish line for his ninth World of Outlaws victory of the season, the right rear tire was flat on the Kasey Kahne Racing machine.
“If we keep fine tuning this thing, I think we can win a lot of races this year,” Sweet said.
With nine wins halfway through the season – seven of them in the last ten races – Sweet is already on track to a career-best year.
“We’ve got a good thing going, and all we want to do is keep the throttle down,” Sweet said. “We just want to win as many of these races as we can. You don’t get these opportunities like we have very often.”
Start / Finish: Wednesday, July 3, Brown County Speedway: 5 / 1 Friday, July 5, Cedar Lake Speedway: 7 / 23 Saturday, July 6, Cedar Lake Speedway: 1 / 1 Points Standing / Total: 1st / 4908 pts. (+50 pts. over 2nd)
Next Race: July 12, Hartford Speedway, Hartford, MI How to Watch or Listen:www.dirtvision.com
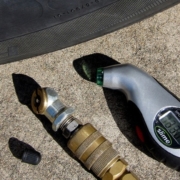
As summer approaches and the weather warms up, your tire pressure fluctuates rapidly, regardless of your driving habits. Knowing how to check tire pressure can go a long way toward helping your tires last longer, keeping a good grip on the road and improving your fuel economy.
Seasons of Change
The temperature of the outside air directly affects the pressure in your tires. Tires lose pressure naturally, at a rate of approximately one to two pounds per square inch per month. They also gain or lose pressure based on the weather, about 1 psi for every 10 degrees Fahrenheit increase or decrease in ambient temperature. For instance, if your tires were set at 32 psi in January, when Boston temperatures were hovering around 30 degrees Fahrenheit, and you didn’t touch your tires until August, when temperatures average over 70 degrees Fahrenheit, your tires could theoretically be as low as 15 psi. If you know when and how to check tire pressure, though, you can dispose of any theoretical physics.
Relieve the Pressure
If you want to maintain traction, safety, fuel economy and tire longevity, follow these three simple steps to check and adjust your tire pressure.
Buy atire pressure gaugeand a portableair compressor.Tire pressure gauges come in a number of varieties that fit any budget. Similarly, portable air compressors that plug into your car’s 12 volt power socket are also generally inexpensive and easy to use. Of course, if you have an air compressor in your garage, you can just run an air hose out to your car.
Look up the proper tire pressure for your vehicle. This is not the “Max. Press.” number on the side of your tire, but rather the specification in your owner’s manual, or on the “Tire and Loading Information” on your driver’s door or door jamb. This pressure was specified for your vehicle to balance tire wear, traction, noise and fuel economy.
Inspect when they’re cold. Check and adjust your tire pressure at least every couple of weeks, when the tires are “cold,” or when your tires have sat for at least three hours. Try to check your tires first thing in the morning, before you’ve gone about your daily business. It generally takes less than 10 minutes and should be performed once every week or two. If you park in a heated garage in the winter, you’ll want to park the car outside overnight before you check your tire pressure. The goal is to get your “cold” tire pressure as close as possible to outside temperatures for the best results.
By following these three simple steps to maintain your tire pressure, you can significantly improve tire longevity, reduce replacement costs and increase fuel economy, because under-inflated tires will cause you to pay more at the pump. Also, properly inflated tires are safer, as they improve traction and reduce the chance of a tire blowout. Why not work checking and adjusting your tire pressure into your weekend routine, just after you mow your lawn and before you fire up the grill this summer?
https://www.aacdelavan.com/wp-content/uploads/2019/07/1562180002_NAPA-Know-How-How-to-Check-Tire-Pressure-in-Three.jpg468895Advanced Auto Clinichttps://www.aacdelavan.com/wp-content/uploads/2021/01/Advanced-Auto-Clinic-Delavan-LOGO_WHITE.pngAdvanced Auto Clinic2019-07-03 10:32:502019-07-03 13:53:23NAPA Know How: How to Check Tire Pressure in Three Simple StepsNAPA Know How Blog
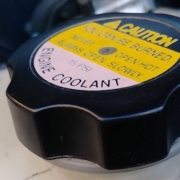
Engines are complex machines with rapidly moving metal parts and small clearances. And as such, they generate a lot of heat. You already know that coolant is an integral part of keeping your engine from exploding, and you probably also know that you have multiple coolant options that aren’t interchangeable. But how do you know which is OK to use? Color is not a reliable indicator in choosing between OAT, IAT and HOAT, so you better choose wisely … and what is HOAT coolant anyway? Let’s dig in.
1. The Story on HOAT
Inorganic Acid Technology (IAT) Coolant was pretty much the original type of coolant and is still used in older vehicles. It lasts around 30,000 miles before it turns too acidic and needs to be changed. Organic Acid Technology (OAT) Coolant uses additives to increase its lifespan significantly — up to around 150,000 miles. Hybrid Organic Acid Technology (HOAT) Coolant is a hybrid of the two.
2. How HOAT Came to Life
You want your coolant to do a few things. Most importantly, it cools the engine, but remember it’s also passing through metal passageways and subject to vastly different operating temperatures, so it needs to deal with all of that. The original IAT is strongly anti-corrosive, but it needs to be changed regularly. OAT lasts much longer, but it doesn’t defend against corrosion as well. Ironically, simply mixing the two can have damaging corrosive effects, but the hybrid-engineered HOAT uses a chemical composition that keeps rust and buildup at bay, is effective at very low and high temperatures alike, and lasts five years and beyond.
3. Careful, HOAT Doesn’t Play Nice
Nope! On the surface, it seems like a hybrid between IAT and OAT would be compatible with either, but that’s not the case. They may share similar names, but the chemical recipe is different enough that manufacturers do not recommend mixing them. Doing so potentially limits your coolant’s effectiveness in doing its job and can greatly reduce the lifespan. And as mentioned earlier, it might actually gunk up the system. This is true even if you’ve drained the coolant from an engine — it’s not so easy as to just add a different type because traces of the old type remain and cling to passageways.
4. When to Use HOAT
As with most other questions about your car, check your owner’s manual. It should specify the coolant type. You may think the benefits of IAT, OAT or HOAT are what your vehicle needs, but it’s not a call you can easily make without cleaning out the entire cooling system (more than just a flush). So it’s really best to just stick with what was designed to support your engine and you will be fine.
Always wait for an engine to cool down before opening a radiator or coolant reservoir cap, as the system is under pressure and the coolant is scalding hot. And remember, contrary to popular belief, color should not be the determining factor for adding or mixing coolant because it is not standardized or indicative of chemical makeup. Always check with the manufacturer to make sure you’re adding what your engine needs.
https://www.aacdelavan.com/wp-content/uploads/2019/06/1561661442_NAPA-Know-How-What-Is-HOAT-Coolant-4-Things-You.jpg468895Advanced Auto Clinichttps://www.aacdelavan.com/wp-content/uploads/2021/01/Advanced-Auto-Clinic-Delavan-LOGO_WHITE.pngAdvanced Auto Clinic2019-06-27 09:17:052023-02-07 10:20:19NAPA Know How: What Is HOAT Coolant? 4 Things You Need To KnowNAPA Know How Blog
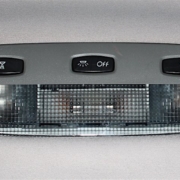
Are things starting to look a bit dim inside your car? It could be time to replace or upgrade your car interior light bulbs. The good news is this is easy — even for a first-timer.
Locate Your Lights
Step one is to find out just how many interior light bulbs your vehicle has and where they are located. Probably best to do this in the evening, early morning or, at the very least, someplace shady. Once you’ve got that dealt with, open the passenger door, see the lights come on, and start looking and counting.
Most newer vehicles have at least a dome light located somewhere in the headliner of the interior roof and a couple of map lights usually mounted close to where the rearview mirror is. But many newer and higher-optioned cars also have map lights for the rear seat passengers, as well as lights in the lower part of the inside of the doors, so that could be four or six more bulbs. And an increasing number of cars the past few years have stepped up their style game by including accent or ambient lighting that illuminates the footwells or the console in between the front seats.
You might have a dozen or more car interior light bulbs. It’s probably best to have a piece of paper and a pencil, or maybe use the “notes” feature on your phone, to keep track of how many you have and where they are. Once you’ve done that, you need to find out what kind of bulb you’re dealing with in each case.
Wedge Base vs. Festoon Bulbs
There are two basic types. The type with a silver cap on both ends, like the one pictured above, is called a “festoon” bulb. The other type only has metal at the bottom — looking kind of like the tip of a knife or of a pair of closed scissors. That’s a “wedge base” bulb. To find out what you have, you need to get a look at the bulbs themselves, so use your electrical hand tools to remove any covers, maybe use a flashlight for the under-dash lights and see which you have (you may have some of both — but in different places) — and then add those to your notes. You’ll need to know which is which and how many of which you need when you go shopping. They’re not interchangeable.
If your car has incandescent bulbs (and most older cars do), you’ll probably notice an improvement just by switching to new bulbs of the same type. But — this can also be an opportunity to upgrade to LED bulbs. They give brighter light and last longer. Knowing what interior light bulbs your car uses will also be helpful if you run into a problem with your car’s interior lights.
https://www.aacdelavan.com/wp-content/uploads/2019/06/1561142806_NAPA-Know-How-How-To-Choose-Car-Interior-Light-BulbsNAPA.jpg468895Advanced Auto Clinichttps://www.aacdelavan.com/wp-content/uploads/2021/01/Advanced-Auto-Clinic-Delavan-LOGO_WHITE.pngAdvanced Auto Clinic2019-06-21 10:26:162019-06-21 13:46:47NAPA Know How: How To Choose Car Interior Light BulbsNAPA Know How Blog
Unlike the classic American cars on the 1950s and earlier, modern automobiles are full of plastic. From door panels and dash pads to the engine cover, plastic is everywhere. While this may be an affordable way for today’s auto manufacturers to build cars, the fact remains that plastic simply does not last as long as metal. Eventually, these plastic components fade and crack, leaving you with the task of replacing it or living with busted parts on your car. But you can fix broken plastic trim if you follow a few steps.
The 1960s saw the biggest change over from metal to plastic. As metal became more expensive and plastic forming technology grew, the automakers quickly grabbed onto plastic as the material of the future. Not only is it cheaper to make, plastic components are much lighter and weigh a fraction of what metal counterparts would. By the 1980s, everything on the inside of a car was plastic. Pop the hood on just about any car made from the late 1990s and you will likely find engine components that are made of plastic. General Motors has even been using composite plastic components inside the engine itself.
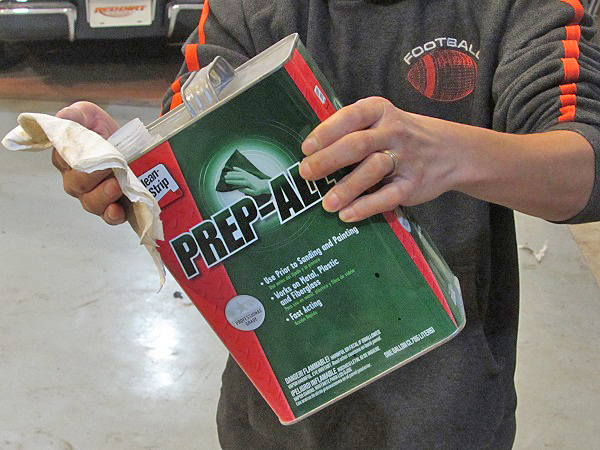
There is not much you can do when composite engine components fail, that is usually a replacement item. On the other hand interior and cosmetic components are easily repaired if you take the time to work it out yourself. All you need are a few products that are readily available at any NAPA Auto Parts Store to fix broken plastic trim parts.
Cleaning the panel with wax and grease remover is the best way to get the part clean without damaging the plastic.
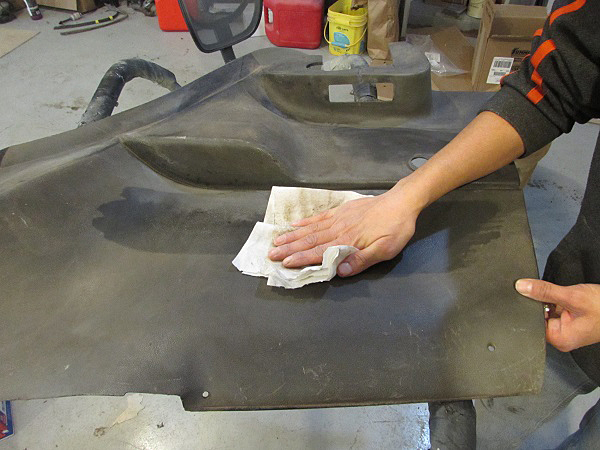
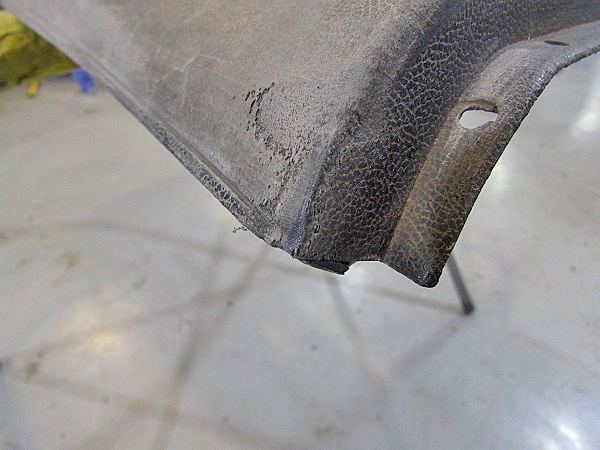
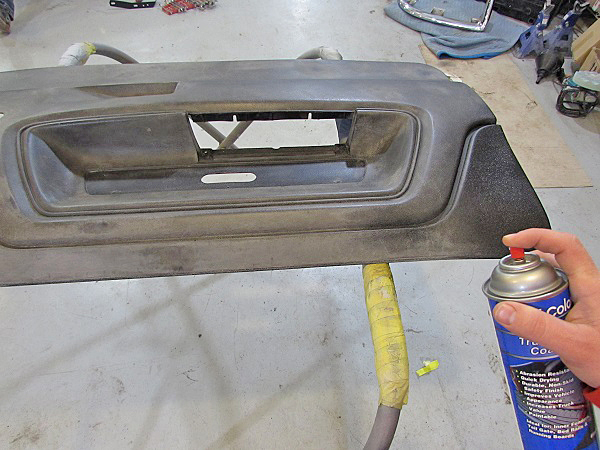
We had a pair of sun-bleached plastic door panels from a 1974 Dodge Challenger that were in need of some restoration. Over time, the sun eats away at plastic and eventually it starts to flake off, much like how steel rusts. In addition to the crusty surface, one corner on each panel had split. These panels are hard to find and expensive. Repairing the panels costs less than $20 and 3 hours (not including cure times).
We used some lint-free shop towels to clean the part. You have to wipe the wax and grease remover on and then wipe it off with a dry cloth.
The process begins with a quick clean up. The panels were wiped down with wax & grease remover. You can use window cleaner, or even soapy water, you just want them to be clean before you start.
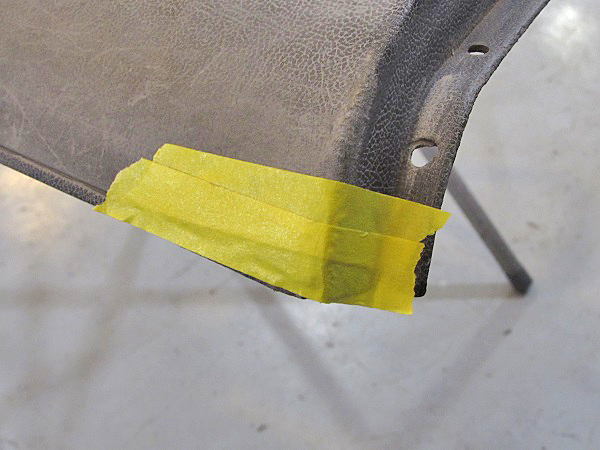
Corners are a high stress area, cracks are common here.
Next, the crack was located and assessed. For this repair, the epoxy will be added to back of the panel, which makes the final finish much easier.
The crack was closed and taped up with masking tape as a backing for the epoxy.
Using the masking tape, we closed the crack and secured it.
The Fix Is In
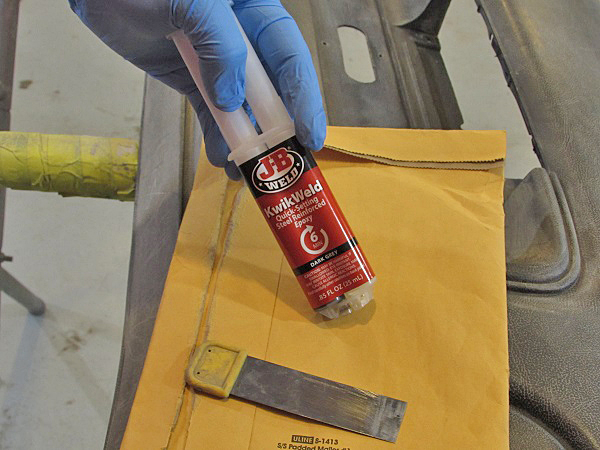
JB Weld Quick Weld works great on metal, fiberglass and plastic. It is metered out in the proper ratios with the plunger.
The tube just measures out the material, it has to be mixed by hand.
Next, we mixed the JB Weld Kwik Weld. You don’t need much, just enough to cover the repair.
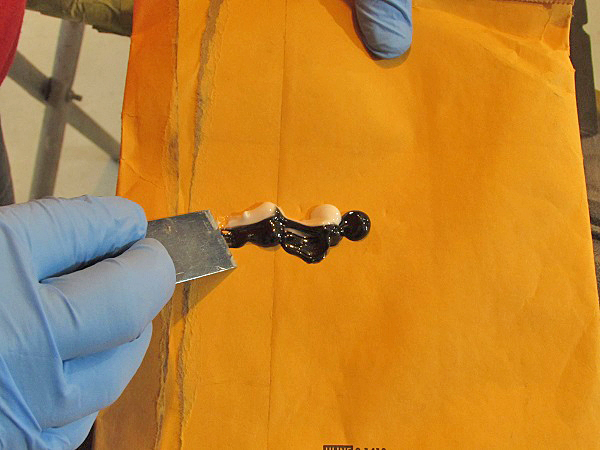
Next, the epoxy gets pressed into the split from the back side. This reduces the amount of finish work required on the visible side.
The epoxy was spread onto the crack, pushing it into the split.he crack was then pushed together and taped again to ensure it would stay closed. The Kwik Weld hardens in 6 minutes, and fully cures in 4 to 6 hours.
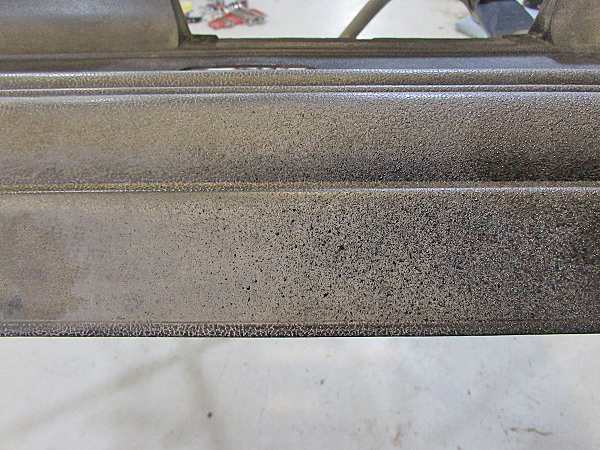
After about 15 minutes, we removed the tape exposing the repaired crack. It could be left like this, but there is some texture loss that needs to be addressed.
The panel was sprayed with a white guide coat before sanding. This helps us see all the damaged areas.
Finishing
Once the repair was complete, we sanded the panel with the 320-grit sandpaper. Anything more coarse than 320 will leave sanding scratches in the final finish. The goal here is to smooth out the oxidized layer, taking off the chalky plastic, leaving the good layer intact.
In order to remove any loose material on the panel, we sanded it down with 320-grit sandpaper.
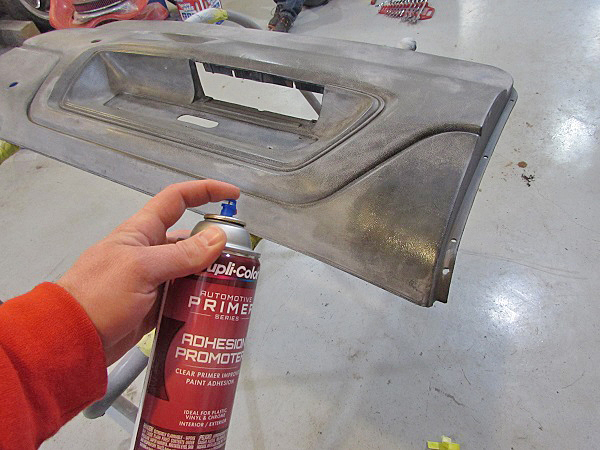
The sanding action removes some of the grain, though much of it was already gone due to the chalky plastic. We can’t replace the exact grain, but we can get pretty close with spray-on bed liner. Plastic is inherently difficult to paint, so we need to prep it well. First, it is cleaned with the wax & grease remover (you need to use this product for this step).
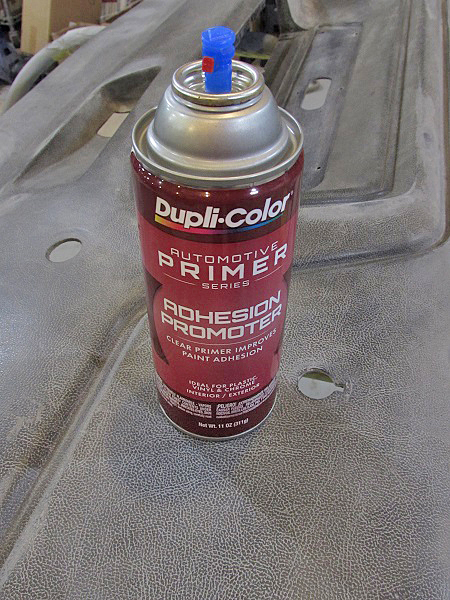
Plastic is hard to paint, as it is an oil-based product. Adhesion promoter helps soften the material, providing a chemical bond as well as a better mechanical bond for the paint.
Next, we sprayed the panel with Dupli-Color Adhesion Promoter. This slightly softens the plastic, providing a mechanical bond that the paint needs to stick.
Spraying the adhesion promoter is done in two medium coats, with 15 minutes dry time between coats.
Adhesion promoter requires two coats with a 15 minute rest between coats, and then a top coat within one hour.
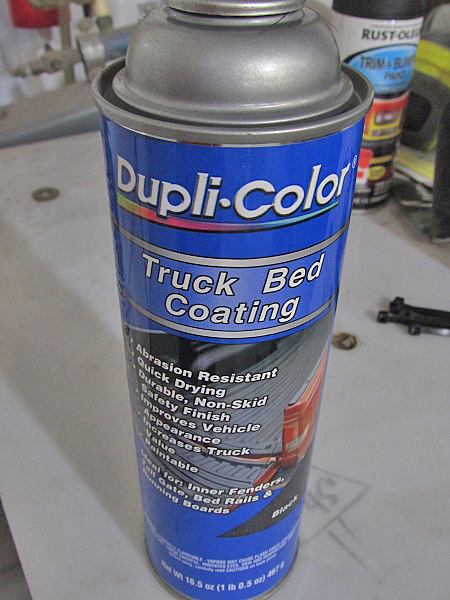
Spray-on bed liner works really well for this process. experimenting with different spray distances, angles, and even mixing bed liner and bumper trim paint can yield different results to match grain.
To recreate the grain, we need a paint that not only is durable, but also formulated for texture. There are many different paints that we could use for texturing. A light grain is best matched with bumper trim paint, but the heavy grain on the Challenger panel needs a larger texture, making the truck bed coating a better match.
Several light coats are best when working with bed liner. Too much build up at once will not look right.
The trick to spraying this stuff is to use several light coats, sprayed from 8 to 15 inches away. The distance gives the paint a chance to dry slightly in the air before hitting the panel. This means the droplets vary in size, the result is a simulated grain that mimics the original grain of the plastic.
Here you can see the various droplet sizing and how the grain is recreated.
The bed liner requires a minimum of 3-4 hours of cure time before touching, but you need to wait 24 hours before reinstalling them.
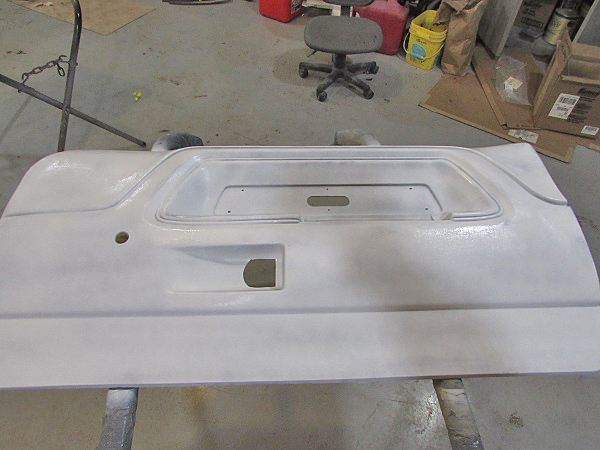
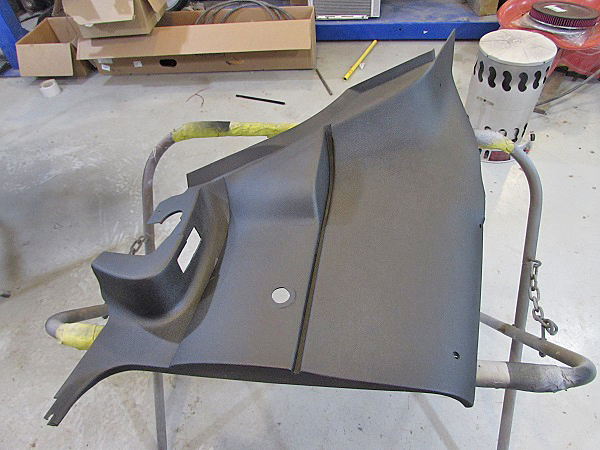
All done, the repaired door panel is ready to be re-installed.
You might notice that the panels are black. Bed liner is always black, which while that works out well for black interiors, it might not fit your tan, red or any other colored interior. All is not lost, however. Once cured, the bed liner can be top coated with any paint to match your interior. That is all there is to this simple plastic repair and refinish project. This process is good for door panels, consoles, A-pillar trim, just about any plastic component that needs repair and restoration.
We used the same process on all 4 door/rear seat trim panels so that they would match.
https://www.aacdelavan.com/wp-content/uploads/2019/06/1560624182_NAPA-Know-How-Busted-How-to-Fix-Broken-Plastic-Trim.jpg6261200Advanced Auto Clinichttps://www.aacdelavan.com/wp-content/uploads/2021/01/Advanced-Auto-Clinic-Delavan-LOGO_WHITE.pngAdvanced Auto Clinic2019-06-14 13:18:162019-06-15 13:43:04NAPA Know How: Busted! How to Fix Broken Plastic Trim
If your lawn mower won’t start, it’s not always easy to know where to begin your troubleshooting. Fortunately, most mowers are relatively simple machines that can be easily serviced at home, which lets you tackle minor repairs without having to tag in a professional.
There are three main requirements for any gasoline-powered engine to function: fuel, air and spark. If you’re missing one of those key elements, then your lawn mower isn’t going to fire up. Here’s how you can investigate each of those concerns if your lawn mower starts giving you starting trouble.
Check On Sparky
Most lawn mowers have a single spark plug design, which means there’s only one plug to check on. You’ll want to first make sure that it’s snuggly connected to the spark plug wire that feeds it the power needed to fire. If that’s in good shape, you should remove the spark plug and verify that it hasn’t become fouled with carbon or any other dirt or debris.
Fuel It Up
Second on our list of things to check when your lawn mower won’t start is the fuel situation. Your machine’s carburetor mixes air and gasoline together before it’s sent into the cylinder for the spark plug to ignite. Occasionally, the carburetor’s internal components may stick and prevent starting, which you can often fix by gently tapping on the side of the carb.
If that doesn’t help — or if the carburetor looks dry, or doesn’t seem to be getting enough fuel — you’ll want to check your mower’s fuel filter to make sure it isn’t clogged and restricting the flow of gasoline. Finally, ask yourself how old the gasoline you are using is. If it’s been sitting all winter, then it may have separated into a watery mess, which simply won’t work in your engine. It’s time to drain the tank and start with fresh gas if this is the case.
Choked Out
The last tip? Verify that your mower can breathe. The air filter on most mowers has a tough job to do because it’s usually operating in an environment where dust, dirt, and grass clippings are flying around at a high rate of speed. In keeping those out of your motor, the filter sacrifices itself and eventually chokes on all of the particles it has collected, requiring its replacement. To avoid hassles, it’s a good idea to change your filter at the start of each summer season.
If you have trouble starting your lawn mower, using these three troubleshooting tips can get your mower running again and get you back to taking care of your lawn. By following regular maintenance schedules and preparing your lawn mower for summer every spring, you’ll ensure that your mower starts up every time.
https://www.aacdelavan.com/wp-content/uploads/2019/06/1560105565_NAPA-Know-How-Lawn-Mower-Wont-Start-Try-These-3.jpg5361024Advanced Auto Clinichttps://www.aacdelavan.com/wp-content/uploads/2021/01/Advanced-Auto-Clinic-Delavan-LOGO_WHITE.pngAdvanced Auto Clinic2019-06-08 18:54:072019-06-09 13:39:26NAPA Know How: Lawn Mower Won’t Start? Try These 3 Troubleshooting TipsNAPA Know How Blog
“I have too many tools” said no Dad ever. While dear old Dad may cringe at the sight of a new necktie, a new tool will always bring a smile. Most gearheads got their start borrowing their Dad’s tools to work on their childhood projects. Tools don’t just help fix broken things, they help connect generations. That’s why tools make such a great Father’s Day gift idea. We’ve put together a list of 10 tools and garage accessories that we think any Father would be happy to unwrap.
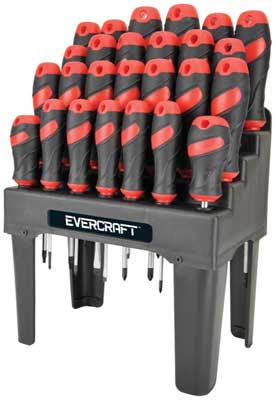
Screwdriver Set with Storage Rack
Screwdrivers have a way of disappearing over time. They are also one of the most used tools in Dad’s arsenal. From tightening hose clamps to changing batteries in toys, a good set of screwdrivers is always welcome. This screwdriver set includes five different drive types: (7) Phillips, (8) Slotted, (3) Poz, (5) Star, and (3) Square. The included storage rack helps Dad keep organized and makes it is easy to know when a tool is missing.
Heavy Duty Tool Tote
A good tool bag has many uses. Whether it is used for an emergency road trip toolbox, power tool storage, or a junkyard warrior portable tool chest, Dad is sure to put this heavy duty tool tote to good use. It features a solid metal transverse rod for strength so it won’t buckle when loaded down with cargo. The hard plastic bottom and exterior help keep its shape without losing the flexibility of a soft tote. Access is easy with the flip-top and interior storage pouches help keep things organized.
20-volt Cordless Drill
A good cordless drill is a must-have for a proper tool collection. Advances in battery technology have made cordless drills amazing powerhouses that can tackle even the toughest jobs without the hassle of dragging out an extension cord. This stout 20-volt lithium-ion cordless drill kit includes everything Dad needs to get the job done: drill, battery, battery charger, and carrying bag. And since it is part of the DeWalt family, it is compatible with an amazing array of additional tools and accessories.
Multi-Piece Socket Set
A socket set is a must for any DIYer. There are seemingly endless options for sockets, and having multiples of the same size is hardly ever a bad thing. It is great to have one set dedicated to the garage toolbox and another set for tossing in the trunk or tool bag. Of course having the right size ratchet drive makes a difference, which is why we picked these 1/4″ drive, 3/8″ drive, and 1/2″ drive socket sets for our list. The 1/4″ drive set is great for tight spaces and light duty jobs. The 3/8″ drive set is a great all-around size that can handle almost any job. When thing get tough there is no replacement for the strength of a 1/2″ drive set. The molded carrying case makes it easy to spot when that 10mm socket has gone missing…again.
Portable Air Compressor Kit
There’s no substitute for a portable air compressor. Not every job calls for the power of a shop size compressor, but there are also some jobs that are too big for a 12v mini compressor. That’s where having a portable compressor with a tank shines. Dad can air up the family bicycle fleet in no time before grabbing his nail gun to finish the deck. This compressor is rated at 2.6 SCFM @ 90 psi with a six gallon tank for plenty of capacity and fast recovery. The compact stacked design with easy carry handle make storage and transport a breeze. As a bonus it also includes an accessory kit with such necessities as an air hose, air blower, inflator, and even a pressure gauge.
Quick-Lift Aluminum Floor Jack
A good floor jack is a must for the well stocked garage. You don’t have to be training for a NASCAR pit crew to appreciate the time saved using a quick-lift jack. This aluminum and steel jack has a low-profile design to make it easier for Dad to get under his slammed hot rod. The jack handle has a foam cushion to help prevent paint damage during wrenching sessions. Dual rear swiveling casters make positioning the jack a snap. Don’t forget a good set of jack stands to go with it.
Ratcheting Wrench Sets
The right specialty wrench can save serious time when working on a project. These polished chrome 14-piece Gearwrench sets feature a standard open end on one side and a ratcheting box end on the other side. The ratcheting mechanism only needs as little as 5-degrees of movement to move a fastener. The flex-head wrench set feature a flexible box ends that tilt up to 180-degrees to get into hard to reach places. The reversible head wrench set features a compact reversing lever to allow changing direction without having to remove the wrench from the fastener.
Bluetooth Speaker
There’s something about wrenching in the garage that needs tunes. While that old 1970s 8-track on the shelf may still technically work, it is woefully behind today’s technology. This water-resistant bluetooth speaker not only looks cool, it is also packed with features. It has a long-life rechargeable battery so it can go anywhere Dad does. It also works as a speaker phone so Dad doesn’t have to worry about getting his phone dirty to answer a call.
Creeper Seat Detailing Rig
Help save Dad’s back with this rolling creeper seat made just for car washing and detailing. The 3″ tall casters make it easy to roll around while the seat cushion doubles as a knee pad. An integrated wash bucket means no more forgetting the soapy water on the other side of the car again. Detailing supplies fit easily in the bottle rack and storage tray, plus an all important cup holder for Dad’s favorite beverage.
LED Interior Light Kit
Jazz up Dad’s ride with a color changing interior light show! This LED interior light kit includes four 12″ long LED light strips, a Bluetooth smart hub , two 48″ long extension cables, two 100″ extension cables, and a 12-volt power adapter. The Bluetooth smart hub syncs to Dad’s phone via the Type S LED App for total lighting control. Choose from 49 solid colors and 8 lighting effect modes like strobe, music mode and more. Settings include brightness and effect mode speed as well as 10 memory presets to save Dad’s favorite settings.
https://www.aacdelavan.com/wp-content/uploads/2019/06/1559587042_NAPA-Know-How-10-Fathers-Day-Gift-Ideas-For-The.jpg468895Advanced Auto Clinichttps://www.aacdelavan.com/wp-content/uploads/2021/01/Advanced-Auto-Clinic-Delavan-LOGO_WHITE.pngAdvanced Auto Clinic2019-06-01 06:49:222019-06-03 13:37:22NAPA Know How: 10 Father’s Day Gift Ideas For The DIY Dad
A lot of new cars are showing up with LED interior lights instead of incandescent bulbs. Should you upgrade your existing vehicles’ interior lighting? Retrofitting certain components is a great way to bring an older vehicle into the modern age. And the fewer things you envy in newer vehicles, the less likely you are to give in to that envy and start committing to a new round of car payments. So spiffing up what you already have makes economic sense beyond the upgrade itself.
It’s Up to You!
For some, this is going to be strictly a matter of personal taste and it will come down to that cool yet intense bluish light that LEDs give. If you love the look and just have to have it, good news! It’s an easy upgrade. If you prefer the warmer, more yellowish light from incandescent bulbs, also good news! You don’t have to change.
That leaves you — on the fence. You could go either way. You don’t hate either type. You don’t love either type. You’re practical. In fact, you’d like some facts to back up all of this emotion.
Again, good news! We just happen to have some.
LEDs vs. Incandescent Bulbs
The biggest advantage of LED interior lights is a long life. Some studies show LEDs last as much as 25 times longer than incandescent bulbs. It’s a myth that they don’t dim over time as incandescent bulbs do, but that happens a lot further down the road — we’re measuring that in decades.
Since we’re talking about the long term here, this is a good time to note that, yes, LEDs cost more than incandescent bulbs do. But remember — they last up to 25 times longer. Especially if you plan on keeping your car for a long time, LEDs are less expensive in the long run.
Compared to other types of bulbs, LEDs are efficient. As much as 90% of the energy an incandescent bulb uses is wasted as heat. The vast majority of the energy fed into an LED produces just one thing — light. That’s because, in an LED, electrons flow to create photons and very little heat is generated by photons.
And LEDs are configurable. Don’t like that bright, bluish light? The very nature of LEDs makes it possible to change the type of light they emit. So you can buy LEDs that will reproduce the warmer light you’re used to from incandescent bulbs, if that’s what you want — or a virtually limitless range of colors and intensities (which can be great for accent and ambient lighting in your car).
A Modern Touch
If it sounds like the facts stack up in favor of LEDs, it helps to remember that the incandescent bulb is a 140-year-old technology. It took a while to top it, but LEDs have. Changing out your old incandescent courtesy bulb for an LED one will go a long way to not only making things brighter on the inside, but also giving your old car a modern feel.
https://www.aacdelavan.com/wp-content/uploads/2019/05/1559068442_NAPA-Know-How-Should-You-Consider-LED-Interior-LightsNAPA-Know.jpg468895Advanced Auto Clinichttps://www.aacdelavan.com/wp-content/uploads/2021/01/Advanced-Auto-Clinic-Delavan-LOGO_WHITE.pngAdvanced Auto Clinic2019-05-28 09:41:322019-05-28 13:34:03NAPA Know How: Should You Consider LED Interior Lights?NAPA Know How Blog


 Blue Seal Certified - Employing ASE-Certified Technicians helps your customers.")