NAPA Know How: How to Use an Oil Filter Wrench For An Easier Oil Change

[ad_1]

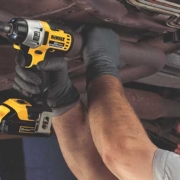
If it’s time for an engine oil change, you’ll need a few different tools and supplies. Gather new engine oil and a new oil filter, plus a wrench or socket for the oil drain plug, a drain pan and some rags for cleanup as well as safety gloves and glasses, too.

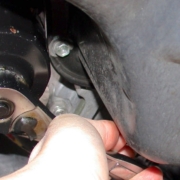
One other tool you’ll definitely need is an oil filter wrench, which comes in handy when a used oil filter doesn’t want to come off easily. Learn how to use an oil filter wrench so you can get the job done quickly and efficiently.

How to Use an Oil Filter Wrench

All oil filters and caps use right-hand threads — clockwise to tighten and counterclockwise to loosen. Some tools only grip counterclockwise for loosening. Several oil filter wrench types are available, each with its own strengths and weaknesses:

  • End Cap: End cap filter wrenches fit a single filter size. You fit the cap to the filter and use a ratchet or wrench to loosen it.
  • Claw: Universal claw-type wrenches have two or three claws that grip the oil filter. The more you turn the ratchet or wrench to loosen the filter, the tighter the claws grip. Spring-loaded claw wrenches tend to stay attached to the filter, freeing up your hands in tight spaces.
  • Band: A band wrench is simple to use and fits a range of filter sizes. It works in one direction, with a swivel handle to fit tight spaces; others are used with a ratchet or wrench. Try flipping it over if it doesn’t grip.
  • Strap: Strap wrenches use a flexible strap to grip the filter. Some have a handle, while others need a ratchet or wrench. Some strap wrenches grip in either direction. To use, clean the strap and filter to prevent slipping. Once the filter is loose, remove the strap before fully loosening the filter and removing it by hand. This prevents oil from soaking into the strap.
  • Pliers: Oil filter pliers spread the force over three or four points to improve grip and limit slip but need more clearance to use. Be sure to get a firm grip with your pliers before attempting to loosen the filter.
  • Chain: Chain wrenches wrap around the oil filter with extreme grip and are very effective. Some chain wrenches work in either direction.
  • Wrench or Ratchet: Some spin-on oil filters and canister filters have a hex or square lug or a hole. Use a wrench, ratchet or socket to loosen the filter for these.

Here’s How NOT to Use an Oil Filter Wrench

For the most part, don’t use an oil filter wrench to install an oil filter, which needs very little torque. Spin-on oil filters are tightened one-half to three-quarters of a turn after gasket contact. For canister filters, use the tool only to tighten until it contacts the base, then apply the correct torque with a torque wrench. Canister filters are sealed by an O-ring and overtightening could break them. Oil filter torque is light, usually 10 to 20 foot-pounds.

Always check your maintenance or repair manual for vehicle specifics before changing your oil. After the oil change, clean up and recycle the used oil. Auto parts stores and many repair shops accept used oil for recycling.

Check out all the car filters available on NAPA Online or trust one of our 17,000 NAPA AutoCare locations for routine maintenance and repairs. For more information on oil filter wrenches, chat with a knowledgeable expert at your local NAPA AUTO PARTS store.

Photo courtesy of Wikimedia Commons.

[ad_2]

NAPA Know How Blog Source link

NAPA Know How: Check Out NAPA’s DeWalt Tools Trade-In Program!

[ad_1]

Combination Tools Kits DCK211S2 12V MAX* Cordless Li-Ion Drill/Driver / Impact Driver Combo Kit $25.00 DCK212S2 12V MAX* Drill/Driver/Recip Saw Combo Kit $25.00 DCD701F2 XTREME 12V MAX* Brushless 3/8 in. Cordless Drill/Driver Kit $25.00 DCK221F2 XTREME 12V MAX* Brushless Cordless Drill & Impact Driver Kit $25.00 DCK498P2 20V MAX* 4-Tool Combo Kit (5 Ah) $100.00 DCK397HM2 20V MAX* Cordless 3-Tool Combo Kit $100.00 DCK398HM2 20V MAX* Cordless 3-Tool Combo Kit $100.00 DCK280C2 20V MAX* Lithium Ion Compact Drill/Driver / Impact Driver Combo Kit (1.5 Ah) $50.00 DCD771C2 20V MAX* Lithium Ion Compact Drill/Driver Kit $25.00 DCK240C2 20V MAX* Lithium Ion Drill Driver/Impact Driver Combo Kit(1.3 Ah) $50.00 DCK484D2 20V MAX* XR® 4-Tool Compact Combo Kit $100.00 DCK483D2 20V MAX* XR® Brushless 4-Tool Combo Kit $100.00 DCK287D2 20V MAX* XR® Brushless Cordless Compact Hammer Drill and Impact Driver Combo Kit $50.00 DCD708C2 ATOMIC 20V MAX* Brushless Compact 1/2 in. Drill/Driver Kit $25.00 DCK278C2 ATOMIC 20V MAX* Brushless Cordless 2-Tool Combo Kit $50.00 Air Compressors C2002WK 6-Gallon Oil-Free Pancake Compressor Kit $25.00 D55140 1 Gallon, 135 PSI Max, Trim Compressor $50.00 D55146 1.6 HP Continuous, 225 PSI, 4.5 Gallon Compressor $50.00 D55151 1.1 HP Continuous 4 Gallon Electric Hand Carry Compressor $50.00 D55167 1.6 HP Continuous, 225 PSI, 15 Gallon Workshop Compressor $50.00 D55168 1.6 HP Continuous, 225 PSI, 15 Gallon Workshop Compressor $50.00 DCC2560T1 60V MAX* FLEXVOLT® 2.5 Gallon Cordless Air Compressor Kit $50.00 Air Tools DWMT70773L 1/2″ Drive Impact Wrench – Heavy Duty $25.00 DWMT70774 1/2″ Drive Impact Wrench – Medium Duty $25.00 DWMT70775 3/8″ Drive Impact Wrench $25.00 DWMT70776L 3/8″ Drive Air Ratchet $25.00 Grinders/Cut Off Tools DWE4011 4-1/2″ Small Angle Grinder with One-Touch™ Guard $25.00 DWE402 4-1/2″ (115mm) Small Angle Grinder $25.00 DW758 8″ (205mm) Bench Grinder $25.00 DCG414T1 FLEXVOLT® 60V MAX* GRINDER 1 BATTERY KIT $50.00 DCG412P2 20V MAX* Lithium Ion Grinder Tool Kit $50.00 DCG426M2 20V MAX* Brushless 1-1/2 in. Variable Speed Cordless Die Grinder Kit $50.00 Hand Tools DWMT73801 108 Piece 1/4 in & 3/8 in Drive Mechanics Tools Set $25.00 DWMT73802 142 pc. ¼ in. & 3/8 in. Drive Mechanics Tool Set $25.00 DWMT73803 168 pc Mechanics Tools Set $25.00 DWMT75049 192 pc Mechanics Tools Set $25.00 Impact Drivers DCF813S2 12V MAX* 3/8″ Impact Wrench Kit $25.00 DCF801F2 XTREME 12V MAX* Brushless 1/4 in. Cordless Impact Driver Kit $25.00 DCF902F2 XTREME 12V MAX* Brushless 3/8 in. Cordless Impact Wrench Kit $25.00 DCF880HM2 20V MAX* 1/2 in. Impact Wrench Kit $50.00 DCF889HM2 20V MAX* 1/2″ High Torque Impact Wrench Kit $100.00 DCF885C1 20V MAX* 1/4″ Impact Driver Kit $25.00 DCF883M2 20V MAX* 3/8 in. Impact Wrench Kit $50.00 DCF894P2 20V MAX* XR® 1/2 in. Mid-Range Cordless Impact Wrench with Detent Pin Anvil Kit $50.00 DCF899HP2 20V MAX* XR® High Torque 1/2 in. Impact Wrench w. Hog Ring Anvil Kit (5.0Ah) $100.00 DCF897P2 20V MAX* XR® High Torque 3/4 in. Impact Wrench w. Hog Ring Anvil (5.0Ah) $100.00 DCF809C1 ATOMIC 20V MAX* Brushless Cordless Compact 1/4 in. Impact Driver Kit Single Battery Kit $25.00 Lawn Tools DCCS670X1 FLEXVOLT® 60V MAX* Brushless Chainsaw Kit $50.00 DCST920P1 20V MAX* String Trimmer $25.00 DCBL720P1 20V MAX* Lithium Ion XR® Brushless Handheld Blower (5.0Ah) $25.00 DCCS620P1 20V MAX* XR® COMPACT 12 IN. CORDLESS CHAINSAW KIT $25.00 DCHT820P1 20V MAX* Lithium Ion Hedge Trimmer (5.0Ah) $25.00 Lights DCL061 18V / 20V MAX* Cordless / Corded LED Worklight $25.00 DCL074 Tool Connect™ 20V MAX* All-Purpose Cordless Work Light (Tool Only) $25.00 DCL079R1 20V MAX* Cordless Tripod Light (Kit) $50.00 Miscellaneous DCC020IB 20V MAX* Corded/Cordless Air Inflator $25.00 D26960K Heat Gun Kit with LCD display $25.00 DCV581H 18/20V MAX* Cordless/Corded Wet-Dry Vacuum $25.00 DCE530P1 20V MAX* Cordless Heat Gun Kit $25.00 DCGG571M1 20V MAX* Grease Gun Kit $50.00 DWE1622K 2″ 2-Speed Magnetic Drill Press $100.00 DWMT70781L Palm Sander $25.00 Polishers 7424XP 6″ Variable-Speed Random Orbit Polisher $25.00 DWP849X 7″ / 9″ Variable Speed Polisher with Soft Start $50.00 DCM848B 20V MAX* XR® 5 in. Cordless Variable-Speed Random Orbit Polisher (Tool Only) $50.00 DCM848P2 20V MAX* XR® 5 in. Cordless Variable-Speed Random Orbit Polisher Kit $50.00 DCM849B 20V MAX* XR® 7 in Cordless Variable-Speed Rotary Polisher (Tool Only) $50.00 DCM849P2 20V MAX* XR® 7 in. Cordless Variable-Speed Rotary Polisher Kit $50.00 Saws DCS575T1 FLEXVOLT® 60V MAX* 7-1/4 in. (184 mm..) CIRCULAR SAW w/Brake Kit $50.00 DCS690X2 FLEXVOLT® 60V MAX* CORDLESS BRUSHLESS 9 IN. CUT-OFF SAW KIT $100.00 DCS388T1 FLEXVOLT® 60V MAX* Brushless Reciprocating Saw 1 Battery Kit $50.00 DCS380P1 20V MAX* Cordless Reciprocating Saw Kit $50.00 DCS571P1 ATOMIC 20V MAX* Brushless 4-1/2 in. Cordless Circular Saw Kit $50.00 D28715 14″ Chop Saw with QUIK-CHANGE™ Keyless Blade Change System $50.00 DWE304 10 Amp Reciprocating Saw $25.00 Socket Sets DWMT19244 1/2 IN. DRIVE STANDARD and DEEP IMPACT SOCKET SET 6 PT. (28 pc.) $25.00 DWMT19248 42 pc. 3/8 in. Drive Combination Impact Socket Set – 6 Point $25.00 DWMT19249 30 Piece 1/2 in Drive Combination Impact Socket Set 6 PT $25.00 Spare Batteries DCB2032 20V MAX* Compact 2Ah Battery 2-Pack $25.00 DCB2052 20V MAX* XR® 5Ah Battery 2-Pack $25.00 DCB6062 20/60V MAX* FLEXVOLT® 6Ah** Battery 2-Pack $25.00

[ad_2]

NAPA Know How Blog Source link

NAPA Know How: Pro Tips for Strut Installation

[ad_1]

While testing your struts is easy, strut replacement is not. First, shock and strut replacement requires lifting and supporting your vehicle to let the suspension hang. If you know how to use a jack and jack stands, you’re already halfway there. Second, strut replacement or coil-over shock replacement usually requires a special strut compressor tool to do the job safely. On the other hand, quick struts are a great DIY option.

Here are a few pro tips to help your strut installation go smoothly.

Why Use Quick Struts?

MacPherson struts and coil-over shocks require a strut compressor or spring compressor tool to disassemble. This heavy-duty tool is necessary to overcome the intense spring pressure that supports your vehicle. But you can still renew your suspension and ride quality by using a safer method. When considering rear coil-over shock installation, these quick struts are a convenient and time-saving solution. Instead of removing the shock and disassembling it, simply remove the entire unit and install a new one.

Identify Strut Orientation

When installing quick struts, match up left and right units as well as their orientation. Shocks and struts may have brackets and tabs for mounting other parts, like height sensors and brake lines. Also, spring orientation can affect ride quality and steering. Use a paint marker to identify strut position and orientation, so you can install the new assemblies similarly. Something as simple as an “L” or an arrow can save a lot of headaches after shock installation.

Support Your Car With Jack Stands

It may be tempting to lift the vehicle and remove the upper strut mounts with the wheels hanging, but the weight of the wheel may yank a wheel speed sensor cable or brake line, damaging it. After the vehicle is lifted and supported on jack stands, use the jack to support the control arm. Once the top mount is loosened — never touch the center nut — you can slowly lower the control arm to remove the whole strut assembly. If you see cables or hoses pulling, disconnect them from their brackets to prevent damage.

Maintain Proper Torque

Proper torque keeps your shock installation from falling apart.Though the weight of the vehicle plays a large part in keeping struts in their place, torque at both top and bottom mounts is critical. Aside from keeping everything together — no one wants to lose a wheel on the highway — proper torque maintains alignment angles that prolong tire life and stabilize steering. Look up torque specifications in the repair manual or ask your local mechanic for more information.

Align Your Wheels

If the strut mounts to the knuckle, front or rear, slight variations in strut manufacture may skew alignment angles, resulting in pulling or abnormal tire wear. Coil-over shocks usually mount to the suspension arm, which don’t affect the alignment angle if removed. Either way, after strut or shock installation, a wheel alignment will get everything lined up properly.

Because there’s no real shock and strut replacement interval, shock installation is typically recommended only if they’re leaking or noticeably bouncy. If you don’t feel confident installing quick struts or performing any other DIY job, bring the job to your local mechanic for professional assistance.

Check out all the steering and suspension parts available on NAPA Online or trust one of our 17,000 NAPA AutoCare locations for routine maintenance and repairs. For more information on strut replacement, chat with a knowledgeable expert at your local NAPA AUTO PARTS store.

Photos courtesy of Benjamin Jerew and Wikimedia Commons.

[ad_2]

NAPA Know How Blog Source link

NAPA Know How: What Is an Engine Air Filter Made of?

[ad_1]

Engine air filters come in lots of different shapes and sizes, but they all do one job: They keep the inside of your engine free from harmful debris. Over the years, the design of engine air filters has changed, from their size to their material, so no one filter works best for all makes and models. Here’s a rundown of an engine air filter’s components.

A Little History

The first cars didn’t have engine air filters — automotive pioneers quickly figured out that debris was getting inside the engines, hurting performance and shortening engine life. Early on, the first solution was a water bath that trapped particles, which led to a second attempt: an oil bath, thicker and stickier, to trap still more impurities. Lastly, their third solution included air filters made of paper or fiber — a variation of which we’ve continued to use for more than half a century.

From Round to Flat

If you look under the hood of older cars with carburetors, you’ll find the engine air filter inside a round container that looks like a holiday cookie tin. The idea was to surround the carburetor with a filter.

As we’ve moved on from carburetors to fuel injection, a large, round air filter would take up important space needed for hoses and wires, including the engine itself. If you have a fuel-injected vehicle, your air filter is probably flat, rectangular and not visible when you first open the hood. Although, there are some nice aftermarket air filters that still get the job done and look good doing it, too.

Common Air Filter Materials

The earliest, simplest engine air filters were made of paper, and some still are, but you can also get filters made of premium cotton, synthetic foam and cotton soaked in oils that trap even more contaminants. Paper filters are produced with different features: Some are treated, others are pleated or embossed, which their manufacturers claim makes them more efficient at trapping impurities before they reach the engine. Other filters use a metal mesh to help with that.

Filter frames also come in a variety of material types. They’re usually made with either plastic or rubber, which are both designed for an airtight fit, eliminating the need for separate gaskets or seals.

Whatever material you choose, the main thing to remember is that you need to change your engine air filter regularly. Just pull the old frame out, put the new one in and you’re good to go for another 10,000 to 15,000 miles. Because they’re so easy to replace, engine air filters are a great maintenance item for a beginner DIYer. Once you add it to your routine maintenance list, your car will run better for longer.

Check out all the engine air filters available on NAPA Online or trust one of our 17,000 NAPA AutoCare locations for routine maintenance and repairs. For more information on air filters, chat with a knowledgeable expert at your local NAPA AUTO PARTS store.

[ad_2]

NAPA Know How Blog Source link

NAPA Know How: How Do You Wire Up a Trailer to Your Car?

[ad_1]

Connecting a trailer to your vehicle is easier than ever, especially with backup cameras to guide you. Yet, the process requires some knowledge about wiring and hitch pins, which control trailer lighting, turn signals, reverse lights and trailer braking.

How do you wire up a trailer to your car? Let’s dive in.

Ensure Your Vehicle Can Do the Job

It’s critical that your vehicle is rated for towing. Not all cars are, and even some utility vehicles aren’t designed for towing. If you tow with a vehicle not intended to pull, you risk damaging its brake and suspension systems. The engine and transmission may not be able to handle the strain, potentially damaging both.

Even if your vehicle is rated for towing, you need to know its towing capability. That information is typically listed in your owner’s manual or on the manufacturer’s website. The weight limit includes the trailer, a boat or other object sitting on the trailer, and anything inside. It’s a good idea to weigh your tow vehicle and trailer before you hit the road. Visit any truck stop with a certified scale to obtain weights.

Use a Wiring Harness

Wiring your trailer makes it possible for the turn signals, lighting, reverse lights and trailer brakes to activate. From both a safety and legal standpoint, each component must work. That’s where a trailer wiring harness comes in.

A trailer wiring harness is vehicle-specific, which means it’s designed for the make, model and year of your vehicle. Also known as a T-connector, it usually plugs in without any splicing required and supplies a standard connection such as a four-way flat. Each harness includes vehicle-specific plugs and, if necessary, an electrical converter. Power is drawn from the tow vehicle’s taillights or from a battery connection.

Make the Connection

When ordering a wiring harness, it’ll come with a four-, five-, six- or seven-way wiring connection, depending on the vehicle and how you’re planning to tow (i.e., a boat trailer with or without surge brakes, utility or camper trailer, or a fifth-wheel or gooseneck trailer).

The wiring is universally color-coded for ease of connection. The colors include:

  • Green (right turn brakes).
  • Yellow (left turn brakes).
  • Brown (taillights).
  • White (ground).
  • Blue (electrical brakes).
  • Black (reverse lights).
  • Red (auxiliary power).

Simply bring the two connection points together, ground the white wire to the frame and you’re ready to go.

It’s important that the wires are properly grounded, otherwise, problems may arise, such as the brakes illuminating unevenly. Use a circuit tester to verify that each wire is correctly supplying power. If the trailer wiring connectors are dirty, apply white vinegar or an electrical degreaser to clean them.

Ready to Hit the Road

Before heading out, make sure the coupler latch is closed, the hitch pin is inserted and the safety chains are in place. Lastly, have someone check while you activate the headlights, turn signals and brakes. Verify a secure trailer connection by driving around your neighborhood. Once satisfied, you’re ready to begin your trip.

And just like that, you’ve transitioned from asking, “How do you wire up a trailer?” to “Are we there yet?”

Check out all the truck and towing products available on NAPA Online or trust one of our 17,000 NAPA AutoCare locations for routine maintenance and repairs. For more information on towing equipment, chat with an expert at your local NAPA AUTO PARTS store.

Photo courtesy of Flickr.

[ad_2]

NAPA Know How Blog Source link

NAPA Know How: How to Choose the Right Off-Road BatteryNAPA Know How Blog

[ad_1]

Choosing the right off-road battery can mean the difference between making it home at the end of a long day on the trail and having to hike back to civilization to find a jump-start. Depending on how or what you’re driving, a standard automotive battery may not be powerful enough for the number of accessories being used on your rig and its lighting demands.

How can you make the best battery decision for your truck or SUV? Let’s take a look at the best options.

Take Stock of Your Setup

The factory battery in your vehicle was designed to handle the specific demands of its stock lighting, heating, cooling and engine systems. Once you add accessories that pull extra power, you need to reevaluate whether your existing alternator and battery setup are still up to the task or if you need to switch to a larger off-road battery system.

Some examples of equipment that can punish your vehicle’s electricals include winches, auxiliary lighting, air compressors and stereo systems. If you’re running one or more of these, check to see if your existing battery can withstand the cumulative load.

Double Up or New Tech?

A common choice for off-roaders seeking additional battery life is to add a second 12-volt battery to the mix. This works fine as long as you have the space under the hood or in the cargo area to mount a second unit that’s protected from potential damage.

Modern trail drivers might find a better option with advanced battery tech. Instead of doubling up, you can use a traditional, sealed lead-acid battery that’s designed to produce deep cycle power that can withstand a heavy load.

An even better option for an off-road battery is to select an absorbed glass mat design. AGM batteries are sealed, so they won’t spill if your vehicle tips sideways or sits at an extreme angle on a hill. They are often smaller than similarly powerful lead-acid batteries and offer better resistance to the vibrations you encounter on a rough trail.

Remember: Choosing the right battery is a combination of understanding your needs, finding an option that fits your budget and making sure that your choice is compatible with the space and connections your vehicle has for mounting a battery. Just as you’ve modified your truck to handle rougher conditions than the factory intended, so too can you upgrade your electrical system to deal with whatever adventure might be thrown your way.

Check out all the batteries available on NAPA Online or trust one of our 17,000 NAPA AutoCare locations for routine maintenance and repairs. For more information on off-road batteries, chat with a knowledgeable expert at your local NAPA AUTO PARTS store.

Photo courtesy of Pixabay.

[ad_2]

NAPA Know How Blog Source link

NAPA Know How: Car Questions You’re Scared to AskNAPA Know How Blog

[ad_1]

In most aspects of life, knowledge is power; this is especially true when it comes to your car. Having insight into how your vehicle works plays a part in keeping you safe on the road, and it can help you handle any car troubles without breaking a sweat.

Asking the right car questions can provide you with some valuable automotive know-how. Still, many people new to owning or caring for a vehicle shy away from asking questions for fear of looking uninformed. If you’re one of those folks, you’re in luck! Here are the answers to four car questions you may have been scared to ask.

What happens if I use gas with a lower octane level than my car’s manufacturer recommends?

When it comes to your car’s fuel, there are two words to watch for in the owner’s manual: “required” and “recommended.” If a specific octane is “required,” always choose that octane when getting gas. Failure to do so could damage the engine.

However, if the manual “recommends” a specific octane, you have more wiggle room. Using a gas with a lower octane than the one recommended by the automaker every once in a while shouldn’t cause any problems. Still, don’t make this a regular practice. Octane ratings impact an engine’s performance and fuel economy. To get the best possible performance and gas mileage, stick with the octane recommended in the owner’s manual.

How often should I check the air in my tires?

Some experts recommend that you check your tire pressure every time you put gas in your car. Not everyone will have the time to do this, but it’s a good rule to follow. At the very least, check your tire pressure once a month. Keeping your tires properly inflated helps to optimize your car’s fuel economy and handling.

How often should I change my car’s timing belt?

Your car’s timing belt plays an important role in the way your vehicle runs. It controls and synchronizes the pistons and valves in a car’s combustion engine. Deterioration of the timing belt can happen suddenly, causing unsafe driving conditions if it happens while you’re behind the wheel. For this reason, it’s advisable to replace the belt according to recommendations given by your mechanic or your vehicle’s owner’s manual. Newer cars can go for up to 100,000 miles without needing a new timing belt, while older vehicles may need a replacement after about 60,000 miles.

How often should I change my car’s air filter?

The air filter keeps sand and other debris from entering your car’s engine. In doing so, it prevents engine damage and extends its life. Typically, it’s recommended that you replace the air filter every 15,000 to 30,000 miles. However, you may need to replace the filter more frequently if your car has a turbocharged engine or if you regularly drive on unpaved roads.

These tips will help you get up to speed on issues related to automotive care and maintenance. Having access to basic car knowledge and advice makes owning a car a lot less stressful.

Check out all the filters and related products available on NAPA Online or trust one of our 17,000 NAPA AutoCare locations for routine maintenance and repairs. For more answers to common car questions, chat with a knowledgeable expert at your local NAPA AUTO PARTS store.

Photo courtesy of Pixabay.

[ad_2]

NAPA Know How Blog Source link

NAPA Know How: 7 Winter Windshield Wiper Tips For Better VisibilityNAPA Know How Blog

[ad_1]

Windshield wipers are essential during the winter. They keep your windshield clear of precipitation and maintain proper visibility while you’re driving. If you want these frontline defenders to perform to their full potential, you need to take care of them.

Here are seven winter windshield wiper tips that will help keep you safe while driving through snow this winter.

1. Don’t Use Your Wipers as Ice Scrapers

If there’s frost on your windshield, using your wipers to clear it away may seem like an easy fix. However, this can damage your wipers. Cold weather makes wipers hard and brittle, so using them to scrape ice could cause the blades to crack and break. Protect your blades by using an ice scraper to remove frost from your vehicle’s front and rear windshields.

2. Inspect Your Wipers

If your wiper blades are cracked or damaged, they won’t be effective. This can be a huge safety hazard when driving in rain or snow — if you can’t see, you can’t drive. To avoid finding yourself in this situation, check the blades regularly for signs of damage or wear, especially in the winter. If there’s an issue, promptly replace the worn blades.

3. Clean Your Wipers and Windshield

Dirt and grime prohibit visibility on a wet or snowy day — if filth is caked on the windshield or wiper blades, moisture from falling rain or snow may spread it across the glass once the wipers are in motion, making it difficult to see beyond the windshield. Avoid this mess by cleaning the glass and wiper blades every couple of weeks.

4. Clear Snow From the Roof and Hood

When clearing snow from your vehicle, don’t stop with just the windshield; remove it from the car’s roof and hood as well. Any snow left in either place will likely blow onto the front or rear windshield once the car is in motion, hampering visibility. Take a thorough approach to snow removal, so you can maintain clear sightlines when driving, and your wipers won’t have to work harder than they should.

5. Check the Washer Nozzles

Your blades need wiper fluid to keep your windshield clear. Snow and ice can block the nozzles that release this fluid onto the glass. Regularly check the nozzles to make sure they aren’t frozen. If they’ve become clogged with ice, use a de-icer.

6. Apply Rubbing Alcohol to the Blades

Ice can cause your wiper blades to freeze to the windshield. Prevent this by applying rubbing alcohol to the blades, which will discourage freezing.

7. Upgrade to a Winter Windshield Wiper

When the temperature drops, switch to winter wipers for the best performance. These wipers are built with a heavy-duty frame crafted to resist twisting, warping and cracking in extreme cold. They’re sturdy enough to keep your windshield free of snow, even in the most severe storms.

Show your wipers a little love, and they’ll help keep you safe all winter long.

Check out all the wiper blades available on NAPA Online or trust one of our 17,000 NAPA AutoCare locations for routine maintenance and repairs. For more information on winter windshield wipers, chat with a knowledgeable expert at your local NAPA AUTO PARTS store.

Photo courtesy of Pixabay.

[ad_2]

NAPA Know How Blog Source link

NAPA Know How: What Is a Throttle Position Sensor?NAPA Know How Blog

[ad_1]

What is a throttle position sensor, and why is it important for it to work correctly? The throttle position sensor (TPS) is an essential part of your vehicle’s fuel management system, tasked with ensuring that a precise blend of air and fuel is routed to your engine. This sensor works in tandem with others sensors to optimize acceleration, cruising speed and fuel economy. Replacing a defective TPS is critical for keeping your vehicle running smoothly. But, exactly what is a throttle position sensor, and how can you recognize when one might be faulty?

TPS Trouble

Manufacturers typically place the throttle position sensor on the throttle valve spindle to monitor its position. The engine control unit (ECU) collects TPS data to optimize vehicle performance.

A faulty throttle position sensor doesn’t happen without warning. Some of the telltale signs include:

  • The panel light activates. Once a TPS goes rogue, the ECU displays a warning on the instrument panel. A diagnostic tool will help you determine what the check engine light is signaling.
  • Your car shakes and quakes. A faulty TPS can cause your car to shake like it has engine knock.
  • The acceleration is unresponsive. Press the pedal to the metal and you should receive an instantaneous response. But not so when the TPS is bad or failing. This doesn’t mean your vehicle won’t move forward, however. Indeed, the ECU may activate a “limp home” mode, which makes it possible to get the vehicle out of traffic and over to the side of the road.
  • The engine stalls or surges. Instead of outright failure, the TPS may cause the engine to stall or surge as the sensor attempts to send the right mixture of fuel and air.
  • The fuel economy nosedives. Sometimes, before the TPS exhibits other signs of trouble, you’ll notice that your car’s fuel economy has taken a direct hit. Specifically, your vehicle will consume more fuel as the engine works harder to compensate for a faulty TPS.

TPS Solution

Once you diagnose the problem, the solution is straightforward: Replace the throttle position sensor. Luckily, this is a job you can handle on your own.

After locating the TPS, disconnect the negative battery terminal before you remove the sensor electrical connector. Next, use a screwdriver to remove the sensor mounting screws, then lift the sensor. Swap out the old sensor with a new one, then reverse the earlier steps. You may need to adjust the sensor screws using a voltmeter to achieve an optimal reading.

TPS Takeaway

When the throttle position sensor is doing its job, your vehicle should accelerate smoothly and maintain its optimal fuel economy. But when it fails, it becomes a safety issue — a problem you must address at once.

Check out all the fuel and emissions products available on NAPA Online or trust one of our 17,000 NAPA AutoCare locations for routine maintenance and repairs. For more information on throttle position sensors, chat with a knowledgeable expert at your local NAPA AUTO PARTS store.

Photo courtesy of Wikimedia Commons.

[ad_2]

NAPA Know How Blog Source link

NAPA Know How: Are You Just Blowing Smoke? [NAPA Know How Blog]

[ad_1]

All combustion engines produce dangerous exhaust gasses as a result of burning fuel at high temperatures. So, when manufacturers design an exhaust system, the two important goals are to route fumes away from the passenger compartment and convert as many toxins as possible into less dangerous chemicals released into the environment. With a bit of ingenuity, it’s possible to use the exhaust for better performance and mileage. How much do you know about the inner workings, components and benefits of your exhaust? Let’s find out.

1. The exhaust system as a whole has multiple functions, but the primary purpose of a muffler is to reduce ______.

  1. Harmful emissions

  2. Noise

  3. Backpressure

2. The catalytic converter uses ______ to reduce toxic gasses in the exhaust system.

  1. Chemical reactions

  2. Bicarbonate filters

  3. Hydraulic pressure

3. Oxygen sensors play a major role in the exhaust functioning, but they don’t last forever. A faulty oxygen sensor may:

  1. Trigger a check engine light

  2. Affect gas mileage

  3. Both

4. The exhaust manifold is located between the ______ and the ______.

  1. Engine block, exhaust pipe

  2. Exhaust pipe, muffler

  3. Catalytic converter, tailpipe

5. There are a few clues that your catalytic converter might be in need of replacement. One is that a bad catalytic converter may begin to smell like:

  1. Maple syrup

  2. Rotten eggs

  3. Fish

6. The smoke coming out of your tailpipe can be a diagnostic tool. Blue smoke out of the exhaust indicates the engine is burning:

  1. Coolant

  2. Too much fuel

  3. Oil

7. Exhaust gasses can be more than just combustion waste. On some engines, a(n) _____ may take and use exhaust gasses to improve performance.

  1. MAF sensor

  2. Exhaust idler valve

  3. Turbocharger

8. An engine that is “running rich” may produce:

  1. Black smoke

  2. White smoke

  3. Blue smoke

9. The combustion process creates toxic gasses that are bad for people and the environment. Harmful emissions include:

  1. Carbon monoxide and nitrogen oxides

  2. Nitrogen and carbon dioxide

  3. Monosodium glutamate and sulfides

10. A blocked exhaust system may cause:

  1. Limited braking abilities

  2. Overheating

  3. Premature tire wear

Answer key: 1b, 2a, 3c, 4a, 5b, 6c, 7c, 8a, 9a, 10b

How’d you do? The exhaust system is an important part of the combustion process with components that drivers should understand and even change from time to time. If this quiz raised any questions for you, search around the NAPA Know How blog for more detailed information.

Check out all the exterior products available on NAPA Online or trust one of our 17,000 NAPA AutoCare locations for routine maintenance and repairs. For more information on the exhaust system, chat with a knowledgeable expert at your local NAPA AUTO PARTS store.

Photos courtesy of Blair Lampe.

[ad_2]

NAPA Know How Blog Source link