Are things starting to look a bit dim inside your car? It could be time to replace or upgrade your car interior light bulbs. The good news is this is easy — even for a first-timer.
Locate Your Lights
Step one is to find out just how many interior light bulbs your vehicle has and where they are located. Probably best to do this in the evening, early morning or, at the very least, someplace shady. Once you’ve got that dealt with, open the passenger door, see the lights come on, and start looking and counting.
Most newer vehicles have at least a dome light located somewhere in the headliner of the interior roof and a couple of map lights usually mounted close to where the rearview mirror is. But many newer and higher-optioned cars also have map lights for the rear seat passengers, as well as lights in the lower part of the inside of the doors, so that could be four or six more bulbs. And an increasing number of cars the past few years have stepped up their style game by including accent or ambient lighting that illuminates the footwells or the console in between the front seats.
You might have a dozen or more car interior light bulbs. It’s probably best to have a piece of paper and a pencil, or maybe use the “notes” feature on your phone, to keep track of how many you have and where they are. Once you’ve done that, you need to find out what kind of bulb you’re dealing with in each case.
Wedge Base vs. Festoon Bulbs
There are two basic types. The type with a silver cap on both ends, like the one pictured above, is called a “festoon” bulb. The other type only has metal at the bottom — looking kind of like the tip of a knife or of a pair of closed scissors. That’s a “wedge base” bulb. To find out what you have, you need to get a look at the bulbs themselves, so use your electrical hand tools to remove any covers, maybe use a flashlight for the under-dash lights and see which you have (you may have some of both — but in different places) — and then add those to your notes. You’ll need to know which is which and how many of which you need when you go shopping. They’re not interchangeable.
If your car has incandescent bulbs (and most older cars do), you’ll probably notice an improvement just by switching to new bulbs of the same type. But — this can also be an opportunity to upgrade to LED bulbs. They give brighter light and last longer. Knowing what interior light bulbs your car uses will also be helpful if you run into a problem with your car’s interior lights.
https://www.aacdelavan.com/wp-content/uploads/2019/06/1561142806_NAPA-Know-How-How-To-Choose-Car-Interior-Light-BulbsNAPA.jpg468895Advanced Auto Clinichttps://www.aacdelavan.com/wp-content/uploads/2021/01/Advanced-Auto-Clinic-Delavan-LOGO_WHITE.pngAdvanced Auto Clinic2019-06-21 10:26:162019-06-21 13:46:47NAPA Know How: How To Choose Car Interior Light BulbsNAPA Know How Blog
Unlike the classic American cars on the 1950s and earlier, modern automobiles are full of plastic. From door panels and dash pads to the engine cover, plastic is everywhere. While this may be an affordable way for today’s auto manufacturers to build cars, the fact remains that plastic simply does not last as long as metal. Eventually, these plastic components fade and crack, leaving you with the task of replacing it or living with busted parts on your car. But you can fix broken plastic trim if you follow a few steps.
The 1960s saw the biggest change over from metal to plastic. As metal became more expensive and plastic forming technology grew, the automakers quickly grabbed onto plastic as the material of the future. Not only is it cheaper to make, plastic components are much lighter and weigh a fraction of what metal counterparts would. By the 1980s, everything on the inside of a car was plastic. Pop the hood on just about any car made from the late 1990s and you will likely find engine components that are made of plastic. General Motors has even been using composite plastic components inside the engine itself.
There is not much you can do when composite engine components fail, that is usually a replacement item. On the other hand interior and cosmetic components are easily repaired if you take the time to work it out yourself. All you need are a few products that are readily available at any NAPA Auto Parts Store to fix broken plastic trim parts.
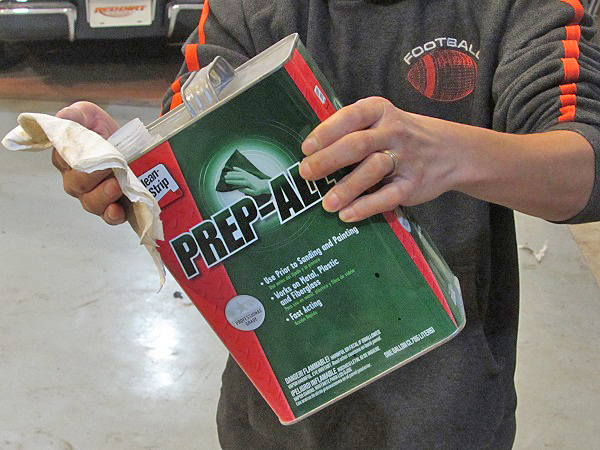
Cleaning the panel with wax and grease remover is the best way to get the part clean without damaging the plastic.
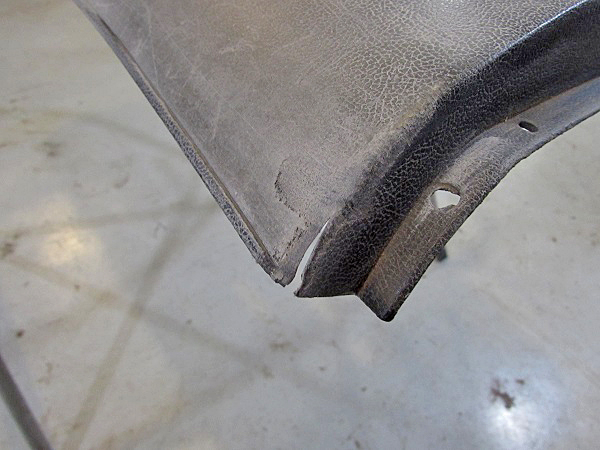
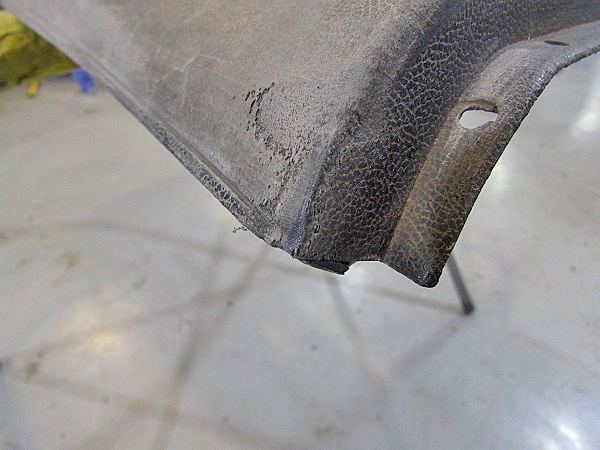
We had a pair of sun-bleached plastic door panels from a 1974 Dodge Challenger that were in need of some restoration. Over time, the sun eats away at plastic and eventually it starts to flake off, much like how steel rusts. In addition to the crusty surface, one corner on each panel had split. These panels are hard to find and expensive. Repairing the panels costs less than $20 and 3 hours (not including cure times).
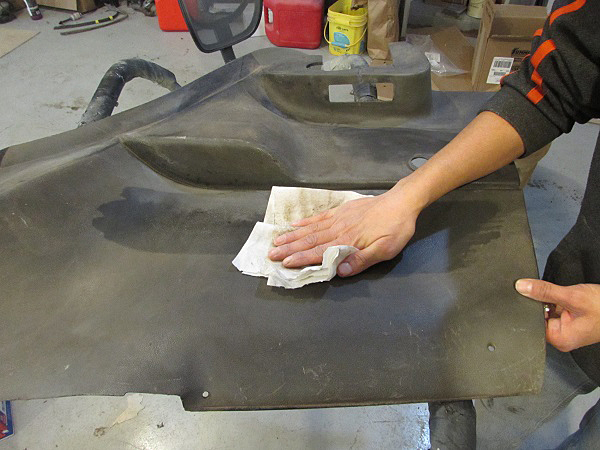
We used some lint-free shop towels to clean the part. You have to wipe the wax and grease remover on and then wipe it off with a dry cloth.
The process begins with a quick clean up. The panels were wiped down with wax & grease remover. You can use window cleaner, or even soapy water, you just want them to be clean before you start.
Corners are a high stress area, cracks are common here.
Next, the crack was located and assessed. For this repair, the epoxy will be added to back of the panel, which makes the final finish much easier.
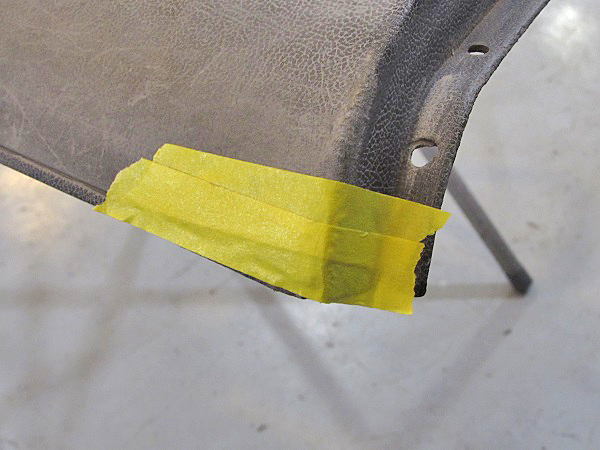
The crack was closed and taped up with masking tape as a backing for the epoxy.
Using the masking tape, we closed the crack and secured it.
The Fix Is In
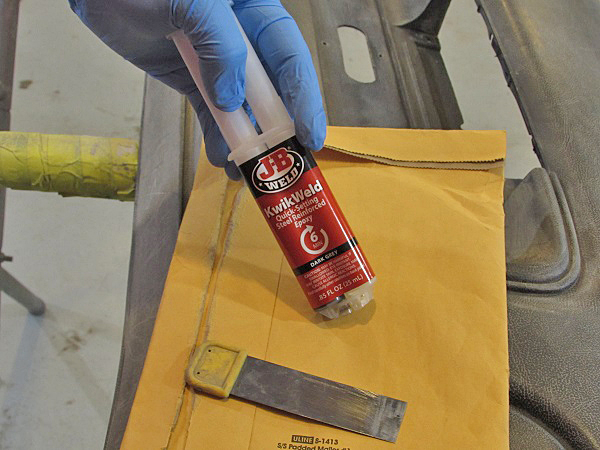
JB Weld Quick Weld works great on metal, fiberglass and plastic. It is metered out in the proper ratios with the plunger.
The tube just measures out the material, it has to be mixed by hand.
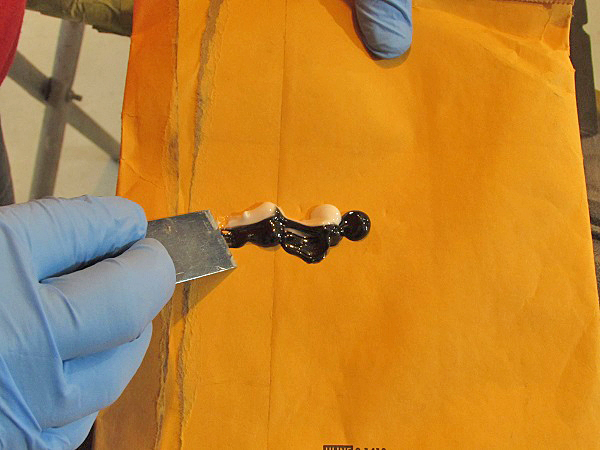
Next, we mixed the JB Weld Kwik Weld. You don’t need much, just enough to cover the repair.
Next, the epoxy gets pressed into the split from the back side. This reduces the amount of finish work required on the visible side.
The epoxy was spread onto the crack, pushing it into the split.he crack was then pushed together and taped again to ensure it would stay closed. The Kwik Weld hardens in 6 minutes, and fully cures in 4 to 6 hours.
After about 15 minutes, we removed the tape exposing the repaired crack. It could be left like this, but there is some texture loss that needs to be addressed.
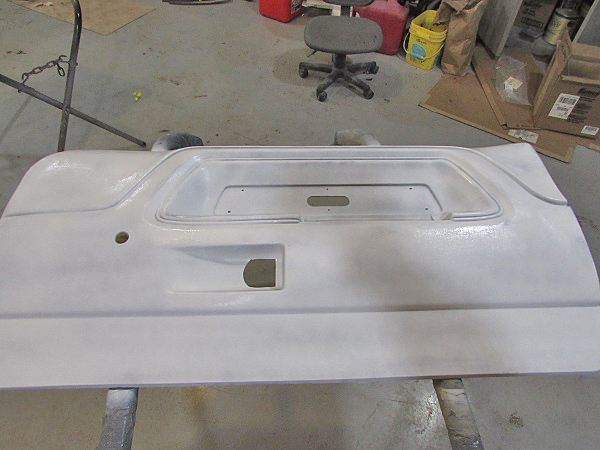
The panel was sprayed with a white guide coat before sanding. This helps us see all the damaged areas.
Finishing
Once the repair was complete, we sanded the panel with the 320-grit sandpaper. Anything more coarse than 320 will leave sanding scratches in the final finish. The goal here is to smooth out the oxidized layer, taking off the chalky plastic, leaving the good layer intact.
In order to remove any loose material on the panel, we sanded it down with 320-grit sandpaper.
The sanding action removes some of the grain, though much of it was already gone due to the chalky plastic. We can’t replace the exact grain, but we can get pretty close with spray-on bed liner. Plastic is inherently difficult to paint, so we need to prep it well. First, it is cleaned with the wax & grease remover (you need to use this product for this step).
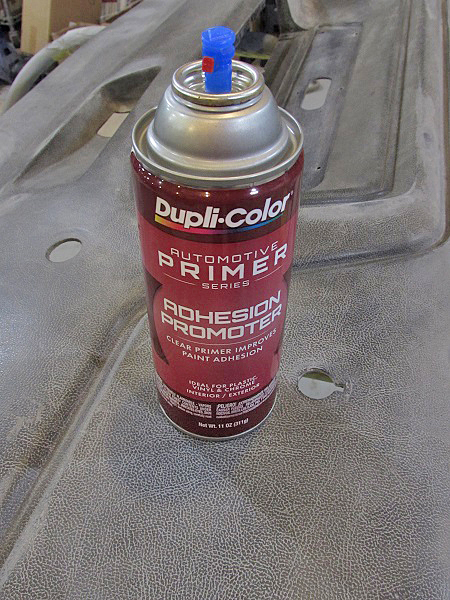
Plastic is hard to paint, as it is an oil-based product. Adhesion promoter helps soften the material, providing a chemical bond as well as a better mechanical bond for the paint.
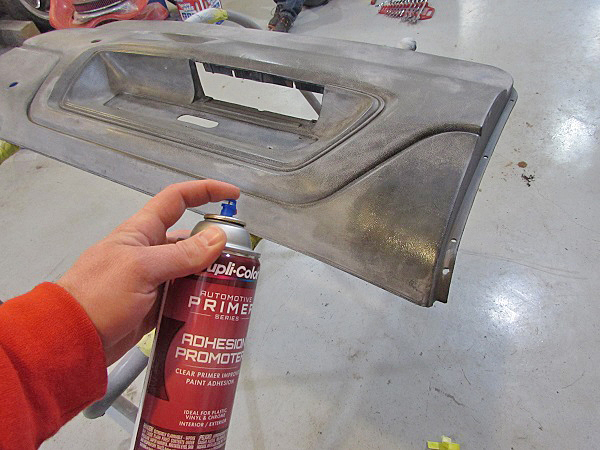
Next, we sprayed the panel with Dupli-Color Adhesion Promoter. This slightly softens the plastic, providing a mechanical bond that the paint needs to stick.
Spraying the adhesion promoter is done in two medium coats, with 15 minutes dry time between coats.
Adhesion promoter requires two coats with a 15 minute rest between coats, and then a top coat within one hour.
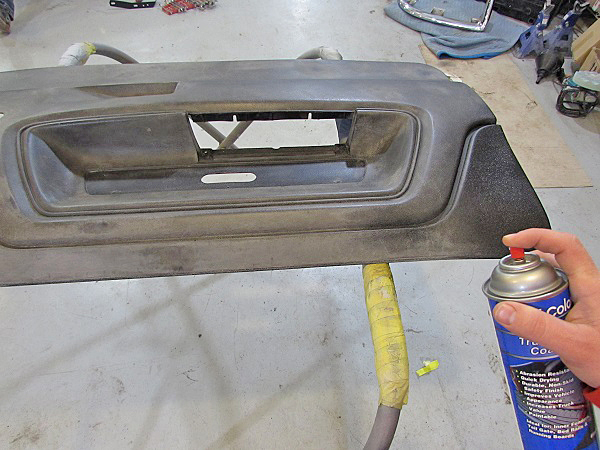
Spray-on bed liner works really well for this process. experimenting with different spray distances, angles, and even mixing bed liner and bumper trim paint can yield different results to match grain.
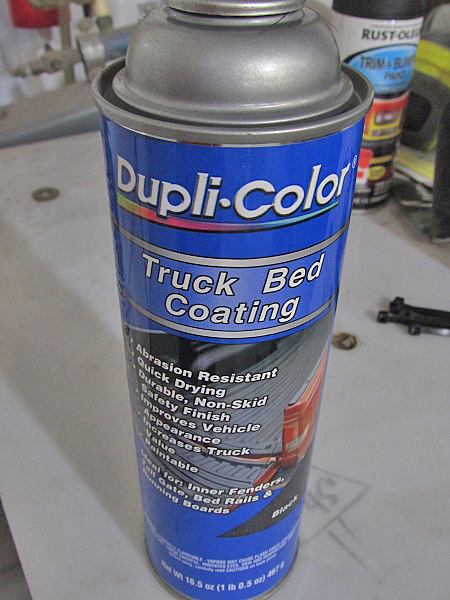
To recreate the grain, we need a paint that not only is durable, but also formulated for texture. There are many different paints that we could use for texturing. A light grain is best matched with bumper trim paint, but the heavy grain on the Challenger panel needs a larger texture, making the truck bed coating a better match.
Several light coats are best when working with bed liner. Too much build up at once will not look right.
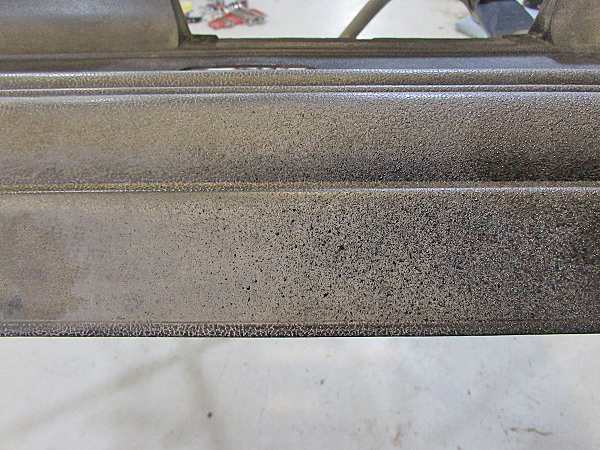
The trick to spraying this stuff is to use several light coats, sprayed from 8 to 15 inches away. The distance gives the paint a chance to dry slightly in the air before hitting the panel. This means the droplets vary in size, the result is a simulated grain that mimics the original grain of the plastic.
Here you can see the various droplet sizing and how the grain is recreated.
The bed liner requires a minimum of 3-4 hours of cure time before touching, but you need to wait 24 hours before reinstalling them.
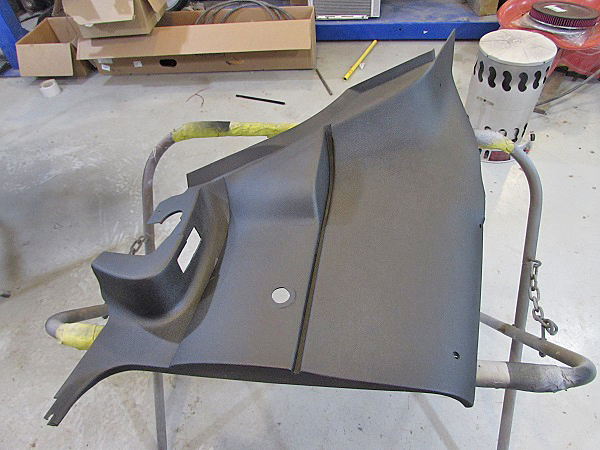
All done, the repaired door panel is ready to be re-installed.
You might notice that the panels are black. Bed liner is always black, which while that works out well for black interiors, it might not fit your tan, red or any other colored interior. All is not lost, however. Once cured, the bed liner can be top coated with any paint to match your interior. That is all there is to this simple plastic repair and refinish project. This process is good for door panels, consoles, A-pillar trim, just about any plastic component that needs repair and restoration.
We used the same process on all 4 door/rear seat trim panels so that they would match.
https://www.aacdelavan.com/wp-content/uploads/2019/06/1560624182_NAPA-Know-How-Busted-How-to-Fix-Broken-Plastic-Trim.jpg6261200Advanced Auto Clinichttps://www.aacdelavan.com/wp-content/uploads/2021/01/Advanced-Auto-Clinic-Delavan-LOGO_WHITE.pngAdvanced Auto Clinic2019-06-14 13:18:162019-06-15 13:43:04NAPA Know How: Busted! How to Fix Broken Plastic Trim
If your lawn mower won’t start, it’s not always easy to know where to begin your troubleshooting. Fortunately, most mowers are relatively simple machines that can be easily serviced at home, which lets you tackle minor repairs without having to tag in a professional.
There are three main requirements for any gasoline-powered engine to function: fuel, air and spark. If you’re missing one of those key elements, then your lawn mower isn’t going to fire up. Here’s how you can investigate each of those concerns if your lawn mower starts giving you starting trouble.
Check On Sparky
Most lawn mowers have a single spark plug design, which means there’s only one plug to check on. You’ll want to first make sure that it’s snuggly connected to the spark plug wire that feeds it the power needed to fire. If that’s in good shape, you should remove the spark plug and verify that it hasn’t become fouled with carbon or any other dirt or debris.
Fuel It Up
Second on our list of things to check when your lawn mower won’t start is the fuel situation. Your machine’s carburetor mixes air and gasoline together before it’s sent into the cylinder for the spark plug to ignite. Occasionally, the carburetor’s internal components may stick and prevent starting, which you can often fix by gently tapping on the side of the carb.
If that doesn’t help — or if the carburetor looks dry, or doesn’t seem to be getting enough fuel — you’ll want to check your mower’s fuel filter to make sure it isn’t clogged and restricting the flow of gasoline. Finally, ask yourself how old the gasoline you are using is. If it’s been sitting all winter, then it may have separated into a watery mess, which simply won’t work in your engine. It’s time to drain the tank and start with fresh gas if this is the case.
Choked Out
The last tip? Verify that your mower can breathe. The air filter on most mowers has a tough job to do because it’s usually operating in an environment where dust, dirt, and grass clippings are flying around at a high rate of speed. In keeping those out of your motor, the filter sacrifices itself and eventually chokes on all of the particles it has collected, requiring its replacement. To avoid hassles, it’s a good idea to change your filter at the start of each summer season.
If you have trouble starting your lawn mower, using these three troubleshooting tips can get your mower running again and get you back to taking care of your lawn. By following regular maintenance schedules and preparing your lawn mower for summer every spring, you’ll ensure that your mower starts up every time.
https://www.aacdelavan.com/wp-content/uploads/2019/06/1560105565_NAPA-Know-How-Lawn-Mower-Wont-Start-Try-These-3.jpg5361024Advanced Auto Clinichttps://www.aacdelavan.com/wp-content/uploads/2021/01/Advanced-Auto-Clinic-Delavan-LOGO_WHITE.pngAdvanced Auto Clinic2019-06-08 18:54:072019-06-09 13:39:26NAPA Know How: Lawn Mower Won’t Start? Try These 3 Troubleshooting TipsNAPA Know How Blog
“I have too many tools” said no Dad ever. While dear old Dad may cringe at the sight of a new necktie, a new tool will always bring a smile. Most gearheads got their start borrowing their Dad’s tools to work on their childhood projects. Tools don’t just help fix broken things, they help connect generations. That’s why tools make such a great Father’s Day gift idea. We’ve put together a list of 10 tools and garage accessories that we think any Father would be happy to unwrap.
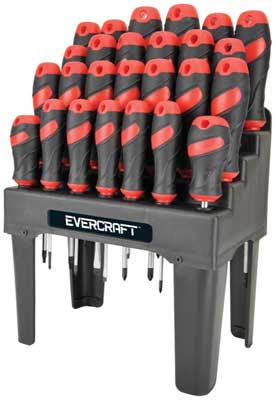
Screwdriver Set with Storage Rack
Screwdrivers have a way of disappearing over time. They are also one of the most used tools in Dad’s arsenal. From tightening hose clamps to changing batteries in toys, a good set of screwdrivers is always welcome. This screwdriver set includes five different drive types: (7) Phillips, (8) Slotted, (3) Poz, (5) Star, and (3) Square. The included storage rack helps Dad keep organized and makes it is easy to know when a tool is missing.
Heavy Duty Tool Tote
A good tool bag has many uses. Whether it is used for an emergency road trip toolbox, power tool storage, or a junkyard warrior portable tool chest, Dad is sure to put this heavy duty tool tote to good use. It features a solid metal transverse rod for strength so it won’t buckle when loaded down with cargo. The hard plastic bottom and exterior help keep its shape without losing the flexibility of a soft tote. Access is easy with the flip-top and interior storage pouches help keep things organized.
20-volt Cordless Drill
A good cordless drill is a must-have for a proper tool collection. Advances in battery technology have made cordless drills amazing powerhouses that can tackle even the toughest jobs without the hassle of dragging out an extension cord. This stout 20-volt lithium-ion cordless drill kit includes everything Dad needs to get the job done: drill, battery, battery charger, and carrying bag. And since it is part of the DeWalt family, it is compatible with an amazing array of additional tools and accessories.
Multi-Piece Socket Set
A socket set is a must for any DIYer. There are seemingly endless options for sockets, and having multiples of the same size is hardly ever a bad thing. It is great to have one set dedicated to the garage toolbox and another set for tossing in the trunk or tool bag. Of course having the right size ratchet drive makes a difference, which is why we picked these 1/4″ drive, 3/8″ drive, and 1/2″ drive socket sets for our list. The 1/4″ drive set is great for tight spaces and light duty jobs. The 3/8″ drive set is a great all-around size that can handle almost any job. When thing get tough there is no replacement for the strength of a 1/2″ drive set. The molded carrying case makes it easy to spot when that 10mm socket has gone missing…again.
Portable Air Compressor Kit
There’s no substitute for a portable air compressor. Not every job calls for the power of a shop size compressor, but there are also some jobs that are too big for a 12v mini compressor. That’s where having a portable compressor with a tank shines. Dad can air up the family bicycle fleet in no time before grabbing his nail gun to finish the deck. This compressor is rated at 2.6 SCFM @ 90 psi with a six gallon tank for plenty of capacity and fast recovery. The compact stacked design with easy carry handle make storage and transport a breeze. As a bonus it also includes an accessory kit with such necessities as an air hose, air blower, inflator, and even a pressure gauge.
Quick-Lift Aluminum Floor Jack
A good floor jack is a must for the well stocked garage. You don’t have to be training for a NASCAR pit crew to appreciate the time saved using a quick-lift jack. This aluminum and steel jack has a low-profile design to make it easier for Dad to get under his slammed hot rod. The jack handle has a foam cushion to help prevent paint damage during wrenching sessions. Dual rear swiveling casters make positioning the jack a snap. Don’t forget a good set of jack stands to go with it.
Ratcheting Wrench Sets
The right specialty wrench can save serious time when working on a project. These polished chrome 14-piece Gearwrench sets feature a standard open end on one side and a ratcheting box end on the other side. The ratcheting mechanism only needs as little as 5-degrees of movement to move a fastener. The flex-head wrench set feature a flexible box ends that tilt up to 180-degrees to get into hard to reach places. The reversible head wrench set features a compact reversing lever to allow changing direction without having to remove the wrench from the fastener.
Bluetooth Speaker
There’s something about wrenching in the garage that needs tunes. While that old 1970s 8-track on the shelf may still technically work, it is woefully behind today’s technology. This water-resistant bluetooth speaker not only looks cool, it is also packed with features. It has a long-life rechargeable battery so it can go anywhere Dad does. It also works as a speaker phone so Dad doesn’t have to worry about getting his phone dirty to answer a call.
Creeper Seat Detailing Rig
Help save Dad’s back with this rolling creeper seat made just for car washing and detailing. The 3″ tall casters make it easy to roll around while the seat cushion doubles as a knee pad. An integrated wash bucket means no more forgetting the soapy water on the other side of the car again. Detailing supplies fit easily in the bottle rack and storage tray, plus an all important cup holder for Dad’s favorite beverage.
LED Interior Light Kit
Jazz up Dad’s ride with a color changing interior light show! This LED interior light kit includes four 12″ long LED light strips, a Bluetooth smart hub , two 48″ long extension cables, two 100″ extension cables, and a 12-volt power adapter. The Bluetooth smart hub syncs to Dad’s phone via the Type S LED App for total lighting control. Choose from 49 solid colors and 8 lighting effect modes like strobe, music mode and more. Settings include brightness and effect mode speed as well as 10 memory presets to save Dad’s favorite settings.
https://www.aacdelavan.com/wp-content/uploads/2019/06/1559587042_NAPA-Know-How-10-Fathers-Day-Gift-Ideas-For-The.jpg468895Advanced Auto Clinichttps://www.aacdelavan.com/wp-content/uploads/2021/01/Advanced-Auto-Clinic-Delavan-LOGO_WHITE.pngAdvanced Auto Clinic2019-06-01 06:49:222019-06-03 13:37:22NAPA Know How: 10 Father’s Day Gift Ideas For The DIY Dad
A lot of new cars are showing up with LED interior lights instead of incandescent bulbs. Should you upgrade your existing vehicles’ interior lighting? Retrofitting certain components is a great way to bring an older vehicle into the modern age. And the fewer things you envy in newer vehicles, the less likely you are to give in to that envy and start committing to a new round of car payments. So spiffing up what you already have makes economic sense beyond the upgrade itself.
It’s Up to You!
For some, this is going to be strictly a matter of personal taste and it will come down to that cool yet intense bluish light that LEDs give. If you love the look and just have to have it, good news! It’s an easy upgrade. If you prefer the warmer, more yellowish light from incandescent bulbs, also good news! You don’t have to change.
That leaves you — on the fence. You could go either way. You don’t hate either type. You don’t love either type. You’re practical. In fact, you’d like some facts to back up all of this emotion.
Again, good news! We just happen to have some.
LEDs vs. Incandescent Bulbs
The biggest advantage of LED interior lights is a long life. Some studies show LEDs last as much as 25 times longer than incandescent bulbs. It’s a myth that they don’t dim over time as incandescent bulbs do, but that happens a lot further down the road — we’re measuring that in decades.
Since we’re talking about the long term here, this is a good time to note that, yes, LEDs cost more than incandescent bulbs do. But remember — they last up to 25 times longer. Especially if you plan on keeping your car for a long time, LEDs are less expensive in the long run.
Compared to other types of bulbs, LEDs are efficient. As much as 90% of the energy an incandescent bulb uses is wasted as heat. The vast majority of the energy fed into an LED produces just one thing — light. That’s because, in an LED, electrons flow to create photons and very little heat is generated by photons.
And LEDs are configurable. Don’t like that bright, bluish light? The very nature of LEDs makes it possible to change the type of light they emit. So you can buy LEDs that will reproduce the warmer light you’re used to from incandescent bulbs, if that’s what you want — or a virtually limitless range of colors and intensities (which can be great for accent and ambient lighting in your car).
A Modern Touch
If it sounds like the facts stack up in favor of LEDs, it helps to remember that the incandescent bulb is a 140-year-old technology. It took a while to top it, but LEDs have. Changing out your old incandescent courtesy bulb for an LED one will go a long way to not only making things brighter on the inside, but also giving your old car a modern feel.
https://www.aacdelavan.com/wp-content/uploads/2019/05/1559068442_NAPA-Know-How-Should-You-Consider-LED-Interior-LightsNAPA-Know.jpg468895Advanced Auto Clinichttps://www.aacdelavan.com/wp-content/uploads/2021/01/Advanced-Auto-Clinic-Delavan-LOGO_WHITE.pngAdvanced Auto Clinic2019-05-28 09:41:322019-05-28 13:34:03NAPA Know How: Should You Consider LED Interior Lights?NAPA Know How Blog
You can see your brakes behind your wheels and at first glance, it might not look like there are many types of brake fluids involved in the process. Take a closer look and you’ll find this is a hydraulic system that uses pressure to move brake fluid down to your brakes to stop your car. If you run out of brake fluid, then the system simply will not work. No fluid means no pressure and that means no brakes. There’s still the emergency or parking brake as backup, but it’s not designed to stop your car the same way as the hydraulic system. Here’s what you need to know about the different types of brake fluids and when it may be time to change or refill those fluids.
Brake Fluid Basics
Not all types of brake fluids are the same. You’ll find a different type of fluid in an everyday sedan than you will in a performance car designed for the track. The key factor in determining which brake fluid to use is the fluid’s boiling point.
While you don’t often jam on the brakes during your morning commute or a typical day of driving, that’s exactly what you do on a track. Repeated hard braking heats up the brakes and it can cause the fluid to boil, resulting in a spongy brake feel and even complete brake failure.
That’s why it’s important to use the right brake fluid for your vehicle. The best way to be sure you have the right brake fluid in your car is to go with what’s in the owner’s manual. If you aren’t sure, don’t guess, because you should never mix different types of brake fluids.
Glycol or Silicone
The most common types of brake fluids are glycol-based and are labeled DOT 3 or DOT 4. The lower number indicates a lower boiling point, so these aren’t what you’ll find in a performance car, but perfectly acceptable for most driving conditions.
Silicone brake fluid is labeled DOT 5 and it has a higher boiling point. It’s also more expensive and is not recommended for every vehicle. It cannot be mixed with a glycol-based brake fluid. This makes it important to know what’s recommended for your vehicle before you start adding fresh fluid.
When to Refill
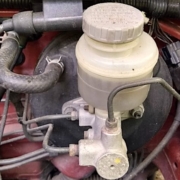
The brake fluid reservoir is in the engine compartment and it’s either white or opaque. There are markings on the outside that show when it’s full or low and you can see the fluid right through the container. If it’s low, then go ahead and add enough to meet the full line, but do not overfill the reservoir.
When to Replace
Brake fluid doesn’t last forever. If your old brake fluid looks dark, much like the color of used engine oil, then it’s probably time to have it changed. Even if it looks fine, it’s still a good idea to change your brake fluid at the manufacturer recommended intervals to ensure this crucial system works properly.
Brake fluid is a necessity if you want your vehicle to stop when you push the brakes. If you’re wondering what kind of brake fluid your car needs or when it needs to be changed, following your car’s owner’s manual is the best way to stay on top of your vehicle’s brake fluid.
https://www.aacdelavan.com/wp-content/uploads/2019/05/1557512784_NAPA-Know-How-Types-of-Brake-Fluids-ExplainedNAPA-Know-How.jpg468895Advanced Auto Clinichttps://www.aacdelavan.com/wp-content/uploads/2021/01/Advanced-Auto-Clinic-Delavan-LOGO_WHITE.pngAdvanced Auto Clinic2019-05-10 12:36:082019-05-10 13:26:25NAPA Know How: Types of Brake Fluids ExplainedNAPA Know How Blog
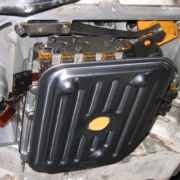
Chances are the automatic transmission filter in your vehicle is something you rarely think about. In fact, it’s most likely not even come up when discussing basic maintenance with your mechanic. This might seem strange, given that most of the other filters on your car or truck have specific service intervals that are important to keep track of.
What’s the deal with this transmission filter? Do you really need to change it? And if not, why not?
Sealed vs. Open
There’s a crucial difference between an automatic transmission filter and every other filter in your vehicle: It’s part of a completely closed system. Your car’s air filter, gas filter, and oil filter are all in place to prevent contamination from the outside world because your engine and fuel tank are open at all times to ingest dirt and other gunk via the intake or fuel tank. Even your cabin filter is exposed to the environment and is responsible for filtering out leaves, dust and pollen.
An automatic transmission, on the other hand, is a completely closed system. Yes, there’s a vent designed to release any pressure that might build up inside of it as it heats up, but it doesn’t suck in any air during that process. In short, it’s blocked off from the outside world.
Two Different Jobs
You might see where this is going. While other filters in your car are busy screening out particles that could damage your engine or make you sneeze, and thus need to be regularly changed, the automatic transmission filter doesn’t fill the same role.
Why, then, is there a filter in the first place? It’s mostly in place to catch any leftovers from the manufacturing process. On occasion, flaws (read: bits of metal) from the transmission’s construction might end up circulating in the hydraulic fluid, and the filter catches those items and keeps them from doing any harm. It’s a very, very small amount of material, which means the filter will never get clogged.
Back in the Day
A few of you might be saying, “Hey, we used to change these filters!” This is true — there was once a time when it wasn’t uncommon to swap out a transmission filter as part of regular fluid servicing. In that era, however, to drain and fill a transmission correctly it was necessary to drop the pan and replace the gaskets at the same time, and so with the gearbox apart, the filter replacement was an easy add-on task (and a bit of a money-maker for garages). Nowadays, it’s possible to drain and fill a transmission without disassembling it, which means the filter replacement is significant extra work for no real benefit.
https://www.aacdelavan.com/wp-content/uploads/2019/05/1556994179_NAPA-Know-How-Do-You-Really-Need-To-Change-It.jpg468895Advanced Auto Clinichttps://www.aacdelavan.com/wp-content/uploads/2021/01/Advanced-Auto-Clinic-Delavan-LOGO_WHITE.pngAdvanced Auto Clinic2019-05-03 14:17:382020-11-13 08:05:43NAPA Know How: Do You Really Need To Change It?
Occasionally, you may remove a spin-on oil filter to find that it has become bloated at or near the top of the can. Because no other damage is evident, other than the deformed shape of the filter, the belief is that the product is exhibiting a manufacturing defect. This is most often not the case. But what causes oil filter bloat?
When Things Go Right
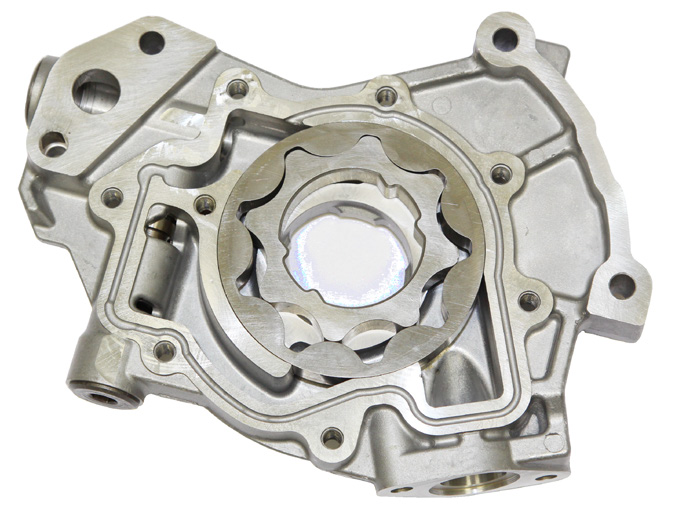
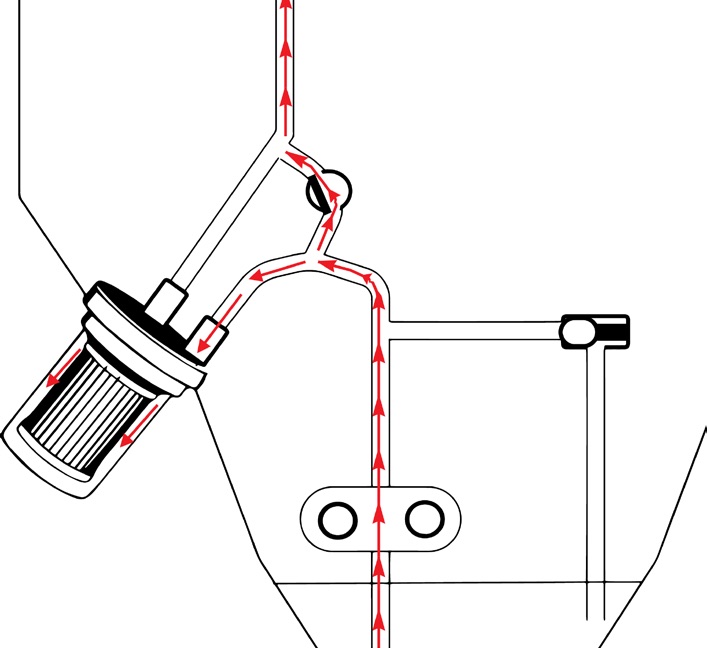
Under normal operating conditions, oil is forced by the oil pump throughout the engine for the purpose of both lubricating and cooling various internal engine components.
High flow from the oil pump causes the Pressure Relief Valve to open, thereby regulating system pressure.
Each vehicle has a predefined normal operating oil pressure which is set by the manufacturer and controlled by the use of a Pressure Relief Valve. The Pressure Relief Valve is most commonly located in the oil pump, where it opens and closes to regulate the flow of oil.
When Things Go Wrong
If this valve becomes defective or fails to function, the lubrication system will experience either low or high oil pressures.
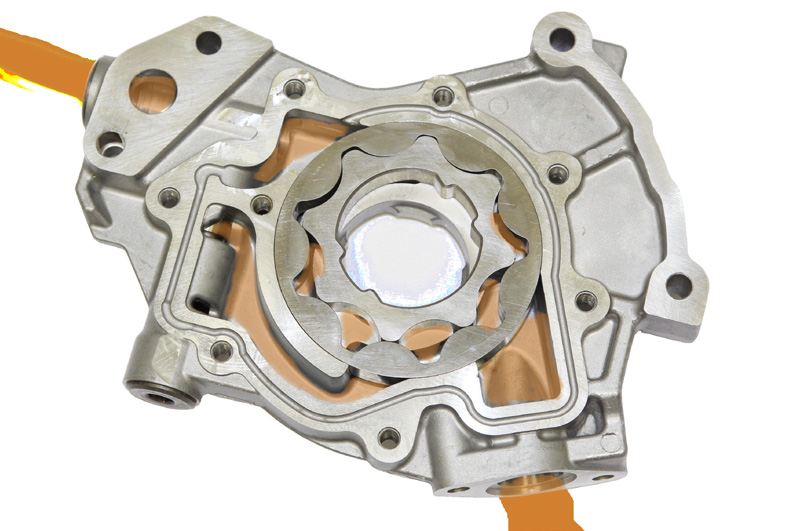
Pressure Relief Valve is stuck in the open position allowing the oil to return to sump.
When the valve becomes stuck in the open position, the vehicle may experience low oil pressure as oil flow is allowed to immediately return to the oil sump.
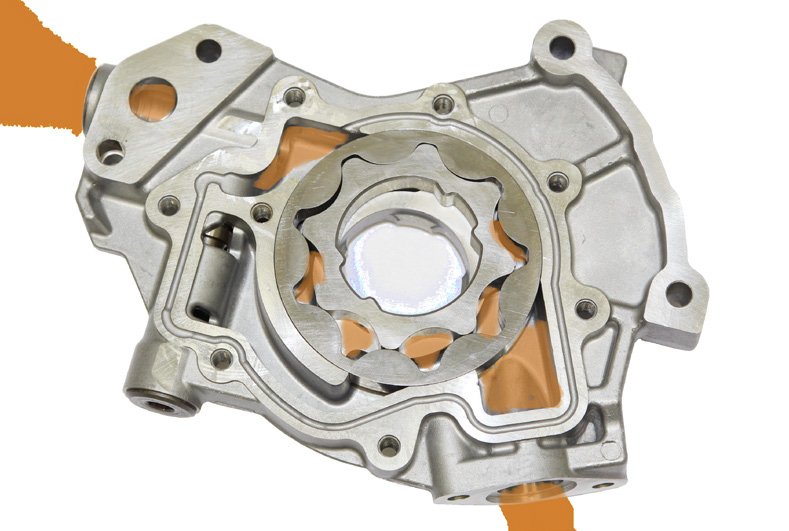
When the valve is stuck in the closed position, the lubrication system can be subjected to the maximum flow rate of the oil pump. This equates to an increase in oil pressure.
Pressure Relief Valve is stuck in the closed position allowing the pump’s complete oil volume to reach the filter.
Since the oil filter is located after the pump, it is often first to be subjected to the uncontrolled surge in oil pressure. If this occurs, the filters will begin to deform or “bloat”. If not corrected, the filter’s baseplate may also bend allowing the gasket to become displaced. A displaced gasket will result in rapid oil loss which may result in engine failure.
Oil filter bloat is a warning indicator that the system’s Pressure Relief Valve has at some point failed. Like many early stage mechanical failures, a sticking valve may be sporadic or even the result of temporary climatic conditions such as very cold morning. In either case, the sticky valve must be remedied to avoid damage to the filter and potentially the vehicle’s engine.
https://www.aacdelavan.com/wp-content/uploads/2019/04/1554401032_NAPA-Know-How-What-Causes-Oil-Filter-Bloat.jpg468895Advanced Auto Clinichttps://www.aacdelavan.com/wp-content/uploads/2021/01/Advanced-Auto-Clinic-Delavan-LOGO_WHITE.pngAdvanced Auto Clinic2019-04-03 10:53:432023-02-07 10:20:13NAPA Know How: What Causes Oil Filter Bloat?
Oil can pass through filter media. Bypass valve closed.
What happen when a spin-on filter is removed from service and upon inspection it is noted that the filter has collapsed in on itself. Why? What has caused this condition? What causes oil filter collapse?
It Isn’t What You Think
The first thought might be that the filter has some type of manufacturing defect that has caused this problem. This is usually not the case. Lubrication systems are equipped with a bypass valve that is present in either the system or within the system’s oil filter. This bypass valve is not to be confused with the pressure regulating valve that controls system oil pressure. The pressure regulating valve opens to redirect oil flow back to the sump when system pressure begins to exceed the manufacturer’s specified ranges.
Oil Must Flow
Oil cannot pass through filter media. Bypass valve opens.
The bypass valve opens to allow oil to go around the filter when conditions make it difficult or impossible for it to pass through the filter media. Cold start-ups or a filter that has not been properly serviced are two common instances during which time it will become necessary for the oil to circumnavigate the filter. The opening of the bypass valve is necessary to prevent oil starvation.
An open bypass valve resulting from a cold start is usually a short term condition because the oil temperature quickly rises as the engine heats up.
Under Pressure
If the bypass valve fails to open, differential pressure may increase to the point of filter collapse.
When the filter is improperly serviced, and becomes plugged, the filtering process can be negated until such time as a new filter is put into service. During this plugged condition, the bypass valve will continually open and close to allow oil to flow around the filter. If this occurs, the oil will not be properly cleaned by the filter. If the bypass valve fails to open, differential pressure may increase to the point of filter collapse.
The oil filter collapse is a clear indicator that the lubrication system is not functioning properly and that maintenance may be required.
https://www.aacdelavan.com/wp-content/uploads/2019/03/1552845336_NAPA-Know-How-NAPA-Know-How-Blog.jpg358895Advanced Auto Clinichttps://www.aacdelavan.com/wp-content/uploads/2021/01/Advanced-Auto-Clinic-Delavan-LOGO_WHITE.pngAdvanced Auto Clinic2019-03-15 15:52:372019-03-17 12:55:37NAPA Know How: NAPA Know How Blog
Fully electric vehicles might save you gas money, but they have other drawbacks at this stage in development. Hybrid vehicles attempt to take the best parts of electric and conventional combustion engines to give drivers something with competitive performance that is cost-effective, reliable and more sustainable for the planet. The electric battery and motors power movement where they can and the combustion engine kicks on to recharge the battery or at times when it’s needed by the system. Therefore, you’ll see both gas mileage and state of charge (SOC) at play. Here are some hybrid battery tips for recognizing the signs of a battery on its way out.
1. You’ve Got Gas
If you observe a noticeable decrease in fuel economy, it could be a failing battery pack. That’s because when the battery doesn’t have the power to do its share or it isn’t charging properly, the vehicle will rely much more heavily on the combustion engine, which will, in turn, require more fuel than usual. So if you’re making frequent stops at the gas station, take it to a trusted technician to figure out why.
2. Charge!
A battery is only as good as its charge. And there is plenty that can go wrong there: undercharging, overcharging, high rate of discharge, parasitic drains … even mechanical problems like bent pins, corrosion, and bad or damaged wiring. When working properly, the battery can be expected to lose charge, but only in a very reliable way. If you park your car overnight with a full charge, but return to the vehicle in the morning and find it to be low, that’s a solid indication of a battery issue.
3. Ups and Downs
Another sign to look for is big swings in the state of charge. Is it showing full one minute and low the next? Is it gaining and losing charge way too quickly? This indicates the battery may not be holding a proper charge or is overcharging or both.
4. Did You Hear That?
Strange sounds, a combustion engine that kicks in too often or a fan that seems to be blowing all the time could all be caused by battery issues. If the combustion engine is on too much, that means the battery isn’t doing its job. A near constant running of the electric fan means the battery is often running hot, which isn’t good for the battery or the components surrounding it.
Of course, there’s always the old warning lights on the dash to look out for. In any case, whether your car is telling you something is wrong in lights or you simply suspect something is off, it’s important to take your hybrid to a trusted mechanic for an inspection. By using these hybrid battery tips, you can catch a problem with your hybrid car’s battery before it leaves you completely stranded.
https://www.aacdelavan.com/wp-content/uploads/2019/03/1551808173_NAPA-Know-How-4-Signs-of-a-Failing-Battery.jpg468895Advanced Auto Clinichttps://www.aacdelavan.com/wp-content/uploads/2021/01/Advanced-Auto-Clinic-Delavan-LOGO_WHITE.pngAdvanced Auto Clinic2019-03-04 15:14:422019-03-05 11:49:34NAPA Know How: 4 Signs of a Failing Battery
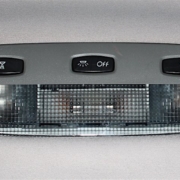
 of map lights usually mounted close to where the rearview mirror is. But many newer and higher-optioned cars also have map lights for the rear seat passengers, as well as lights in the lower part of the inside of the doors, so that could be four or six more bulbs. And an increasing number of cars the past few years have stepped up their style game by including accent or ambient lighting that illuminates the footwells or the console in between the front seats.


 Blue Seal Certified - Employing ASE-Certified Technicians helps your customers.")